# Tutorials
# Usage
# Setting up Metamask wallet for BPX Chain (Chrome extension)
1\. Open **MetaMask**. Expand the list of available networks.
[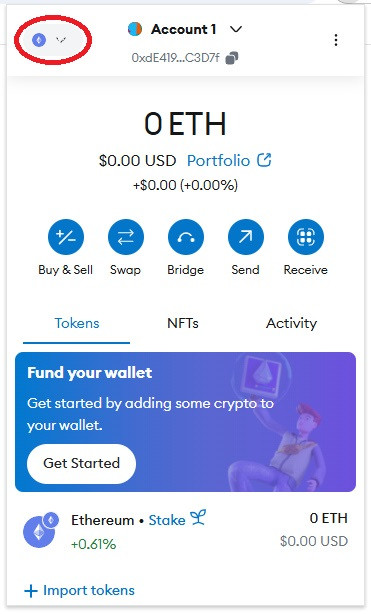](https://docs.bpxchain.cc/uploads/images/gallery/2024-11/WKQWMd401fJGOLZa-metamask-chrome1.jpg)
2\. Scroll to the bottom and select "**Add a custom network**".
[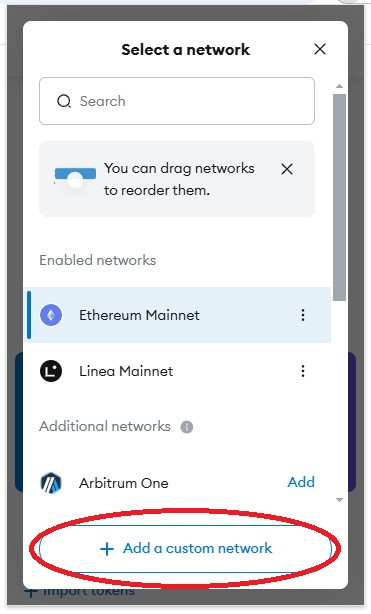](https://docs.bpxchain.cc/uploads/images/gallery/2024-11/htlnApEne3ZnDfwL-metamask-chrome2.jpg)
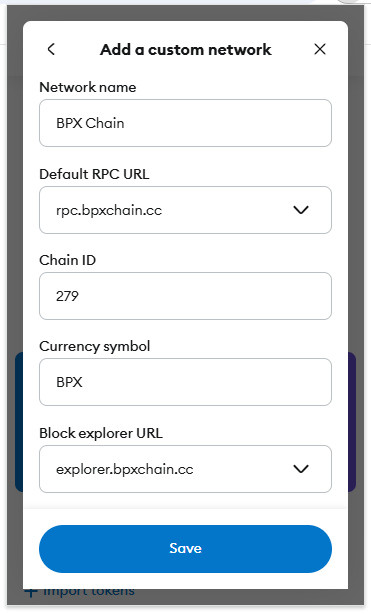
3\. Fill out the form as follows and click "**Save**":
**Network name:** BPX Chain
**Default RPC URL:** https://rpc.bpxchain.cc
**Chain ID:** 279
**Currency symbol:** BPX
**Block explorer URL:** https://explorer.bpxchain.cc
[](https://docs.bpxchain.cc/uploads/images/gallery/2024-11/P8gyyjhTXWdWYgYP-metamask-chrome3.jpg)
4\. You should see a success notification. Expand the list of available networks again.
[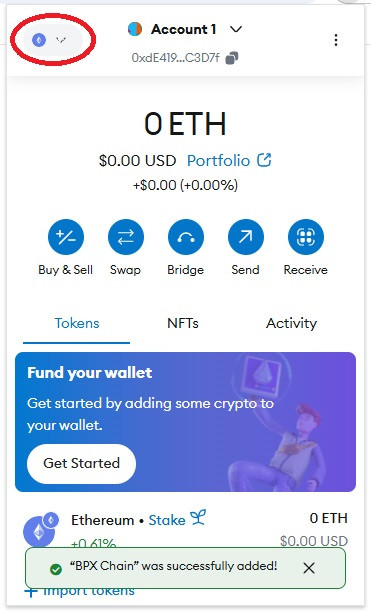](https://docs.bpxchain.cc/uploads/images/gallery/2024-11/7SPJPUEZkch2btLH-metamask-chrome4.jpg)
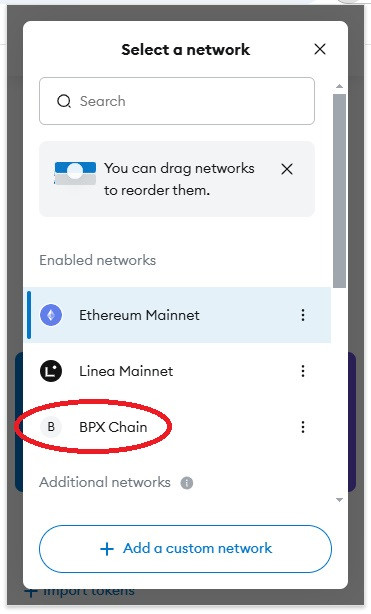
5\. Select "**BPX Chain**", which should now be on the list.
[](https://docs.bpxchain.cc/uploads/images/gallery/2024-11/5JJJeOcEXSjXjv9K-metamask-chrome5.jpg)
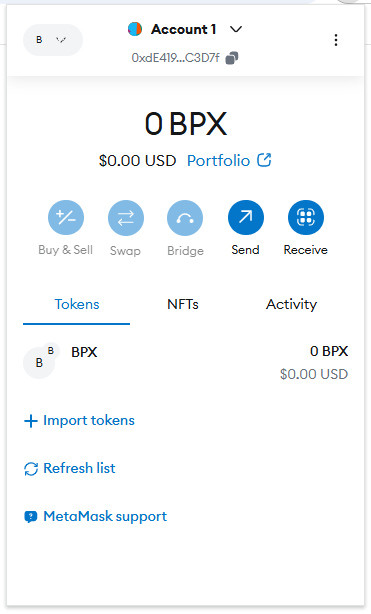
6\. Your wallet is now ready to use.
[](https://docs.bpxchain.cc/uploads/images/gallery/2024-11/HcYDTdkBXa7Zklch-metamask-chrome6.jpg)
# Setting up Metamask wallet for BPX Chain (Mobile app)
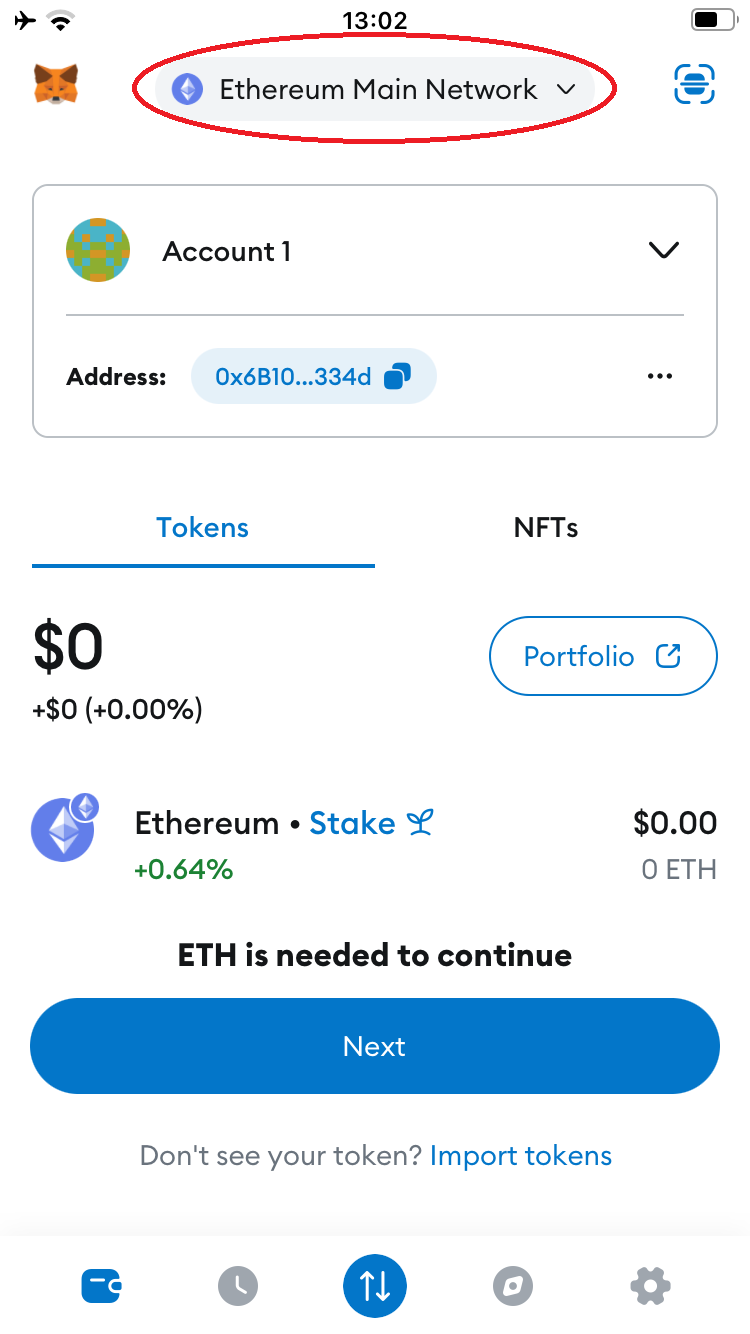
1\. Open **MetaMask**. Expand the list of available networks.
[](https://docs.bpxchain.cc/uploads/images/gallery/2024-11/ejwhE9hEqRIAa2PB-metamask-mobile1.PNG)
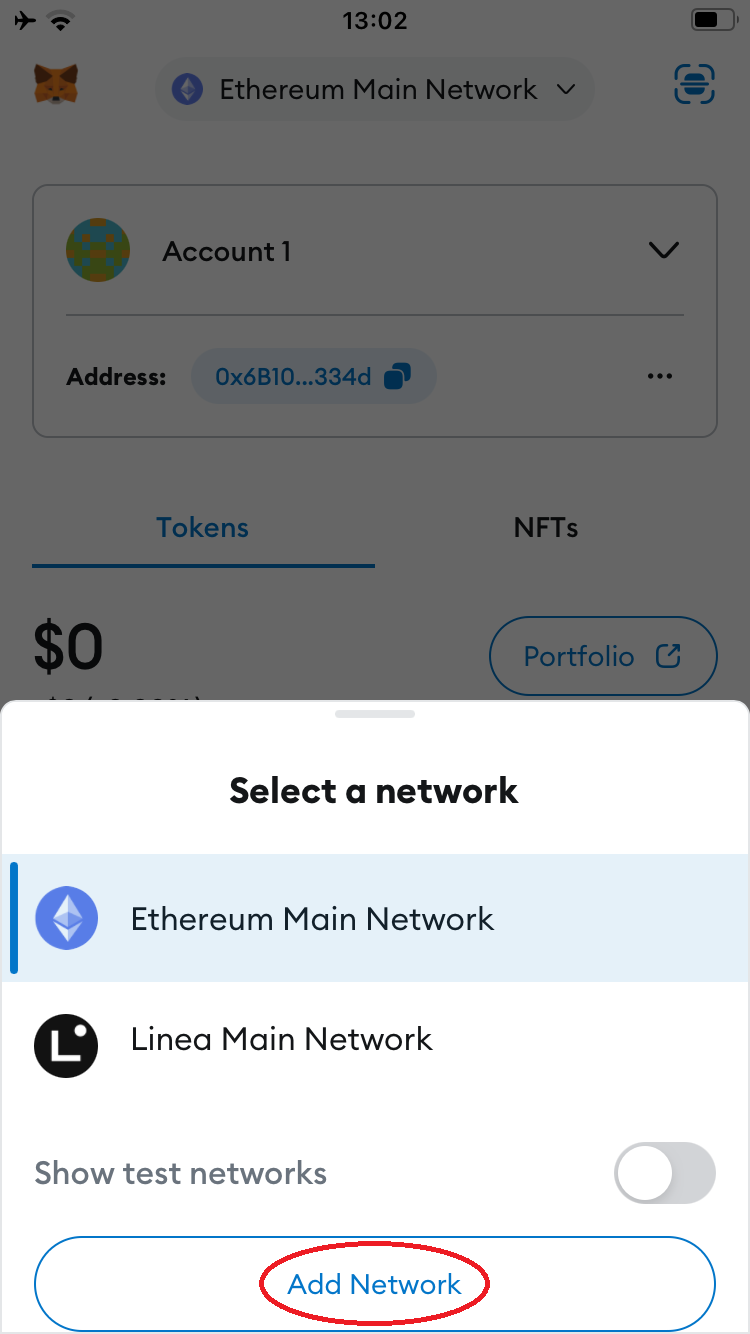
2\. Select "**Add Network**".
[](https://docs.bpxchain.cc/uploads/images/gallery/2024-11/of3ZP46xQOyHIC1A-metamask-mobile2.PNG)
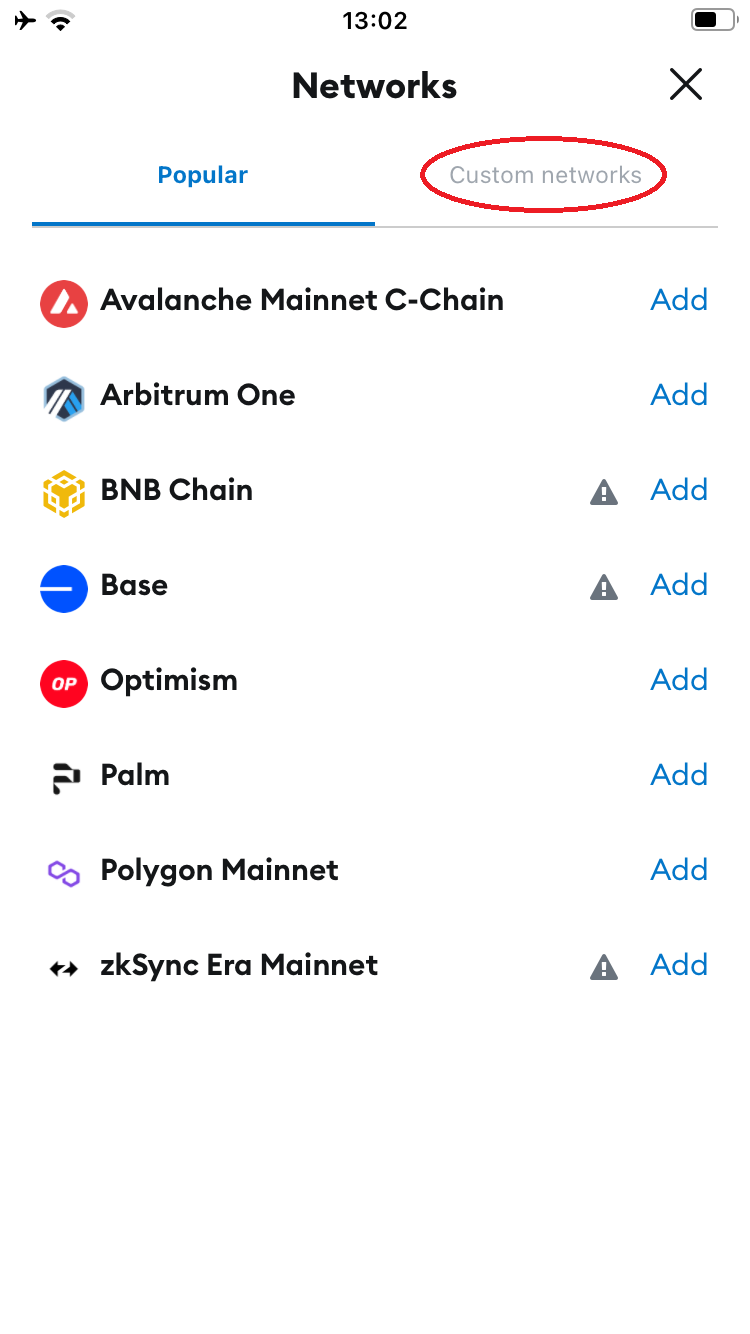
3\. Go to the "**Custom networks**" tab.
[](https://docs.bpxchain.cc/uploads/images/gallery/2024-11/RXB1JmyFTRaWnRtt-metamask-mobile3.PNG)
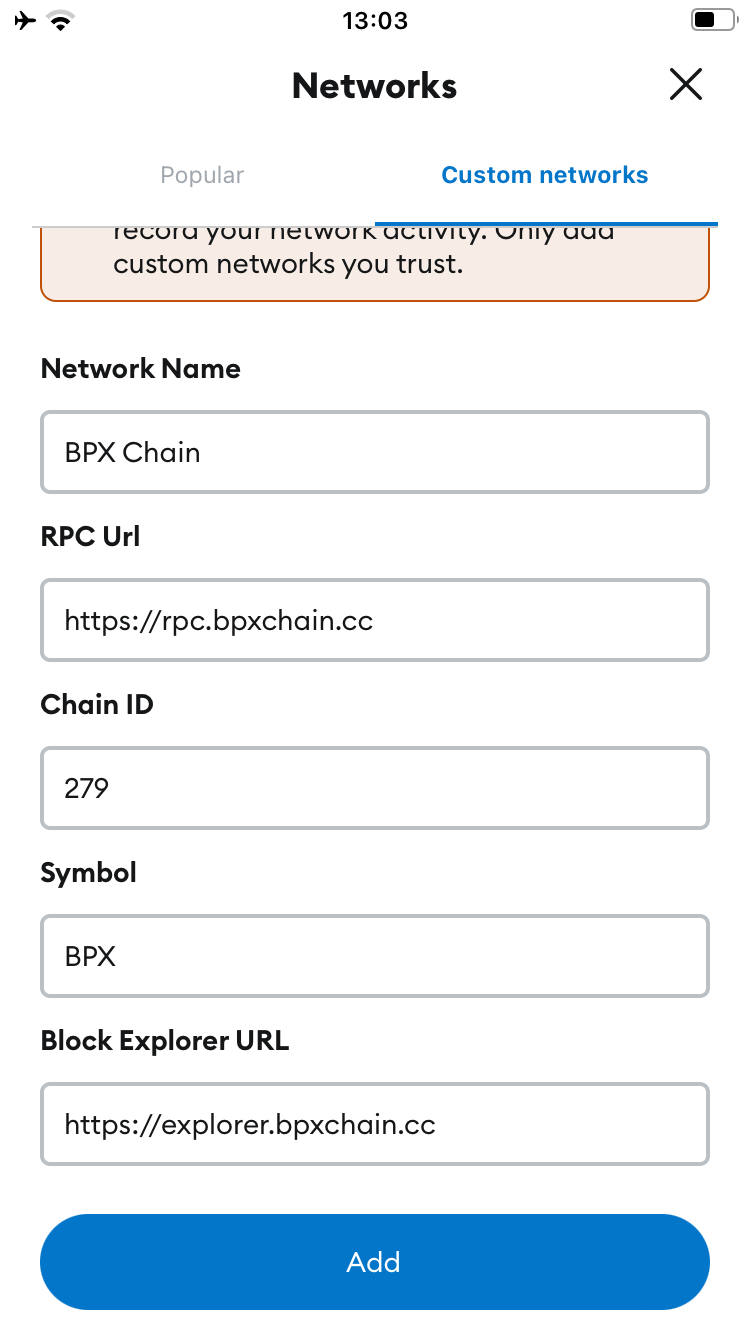
4\. Fill out the form as follows and confirm:
**Network name:** BPX Chain
**Default RPC URL:** https://rpc.bpxchain.cc
**Chain ID:** 279
**Currency symbol:** BPX
**Block explorer URL:** https://explorer.bpxchain.cc
[](https://docs.bpxchain.cc/uploads/images/gallery/2024-11/TwwSjQo1AA8gN70a-metamask-mobile4.PNG)
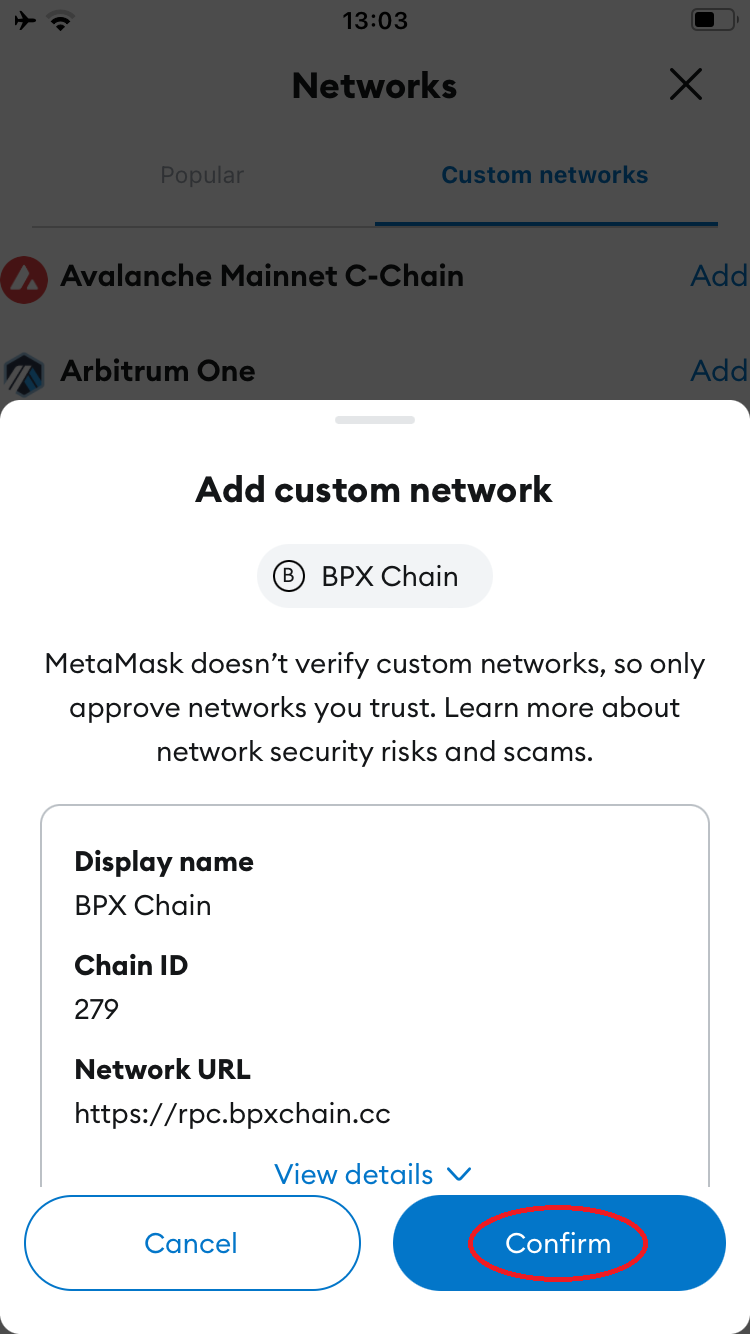
5\. Proceed through the next steps by tapping "**Confirm**", "**Switch to network**", and "**Got it**".
[ ](https://docs.bpxchain.cc/uploads/images/gallery/2024-11/v6m41dIdTYh8Wd68-metamask-mobile5.PNG)[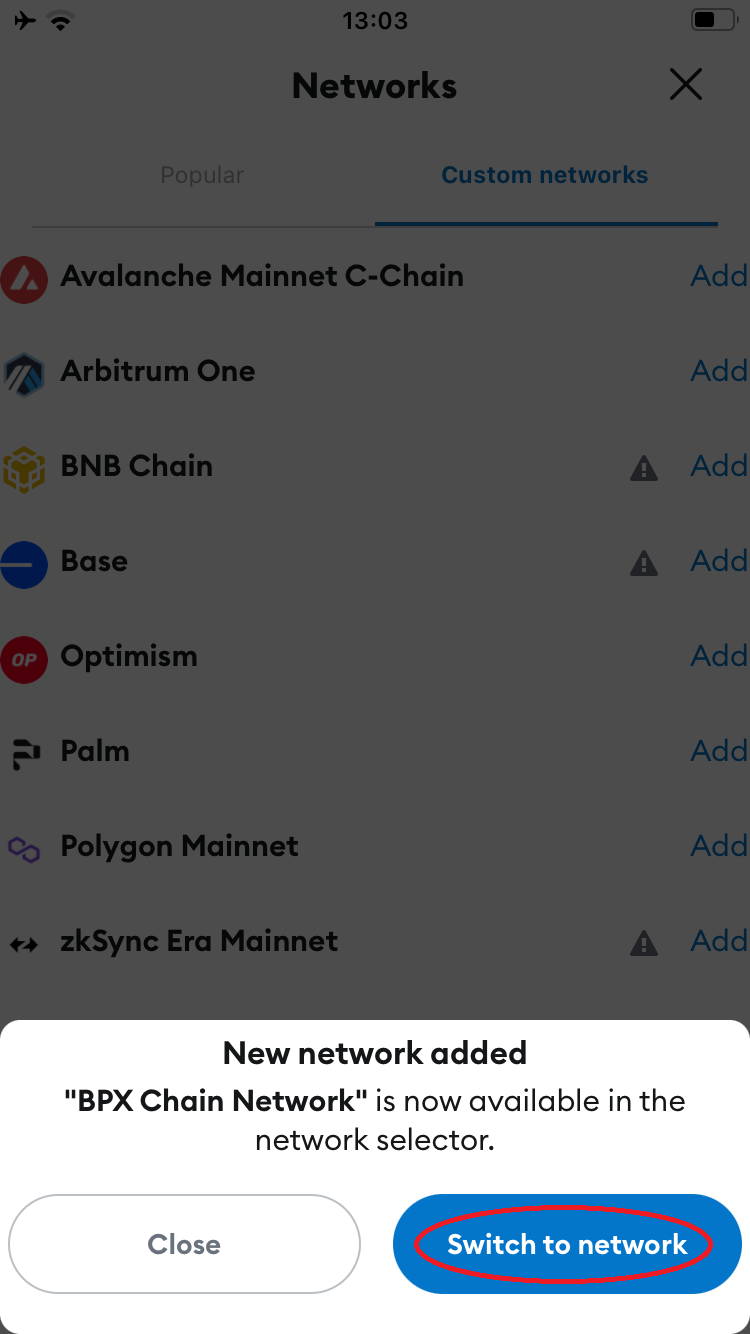 ](https://docs.bpxchain.cc/uploads/images/gallery/2024-11/FzoiqPrQeYFEvuHk-metamask-mobile6.PNG)[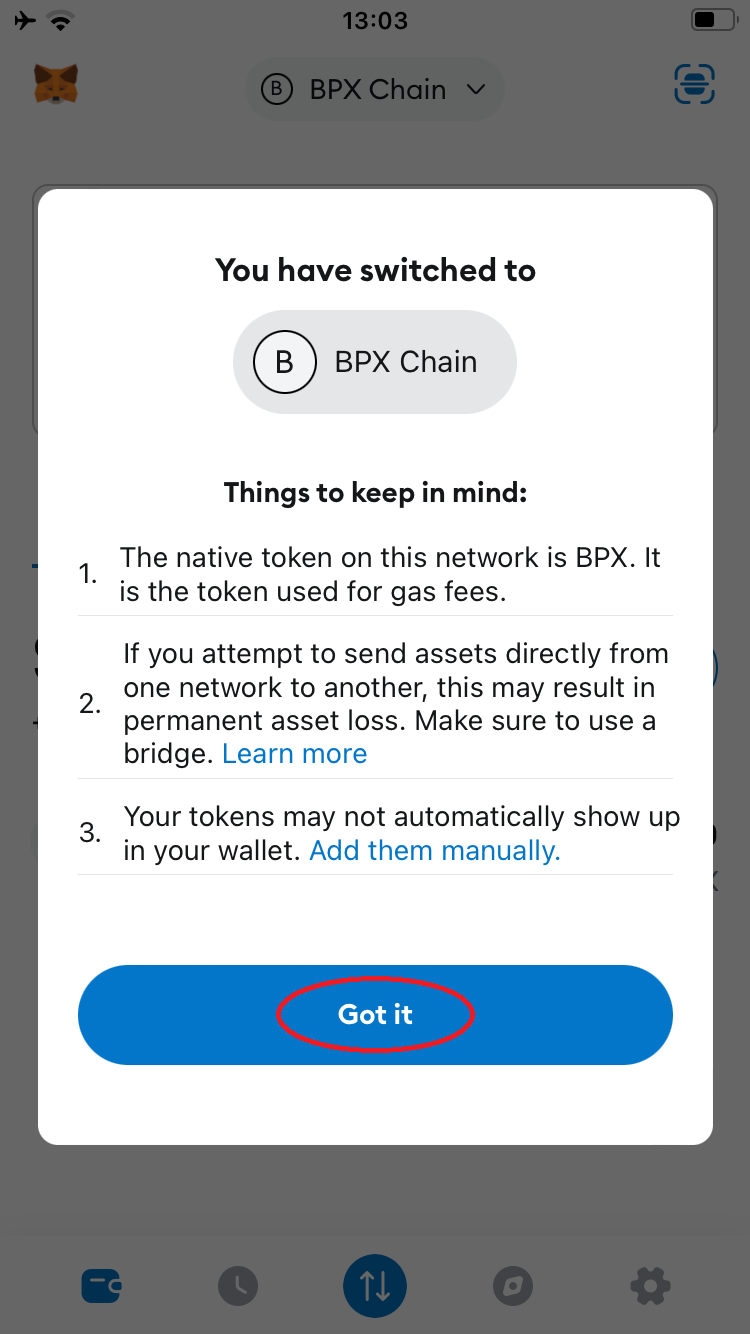](https://docs.bpxchain.cc/uploads/images/gallery/2024-11/zTp33wAFcgYrSLDK-metamask-mobile7.PNG)
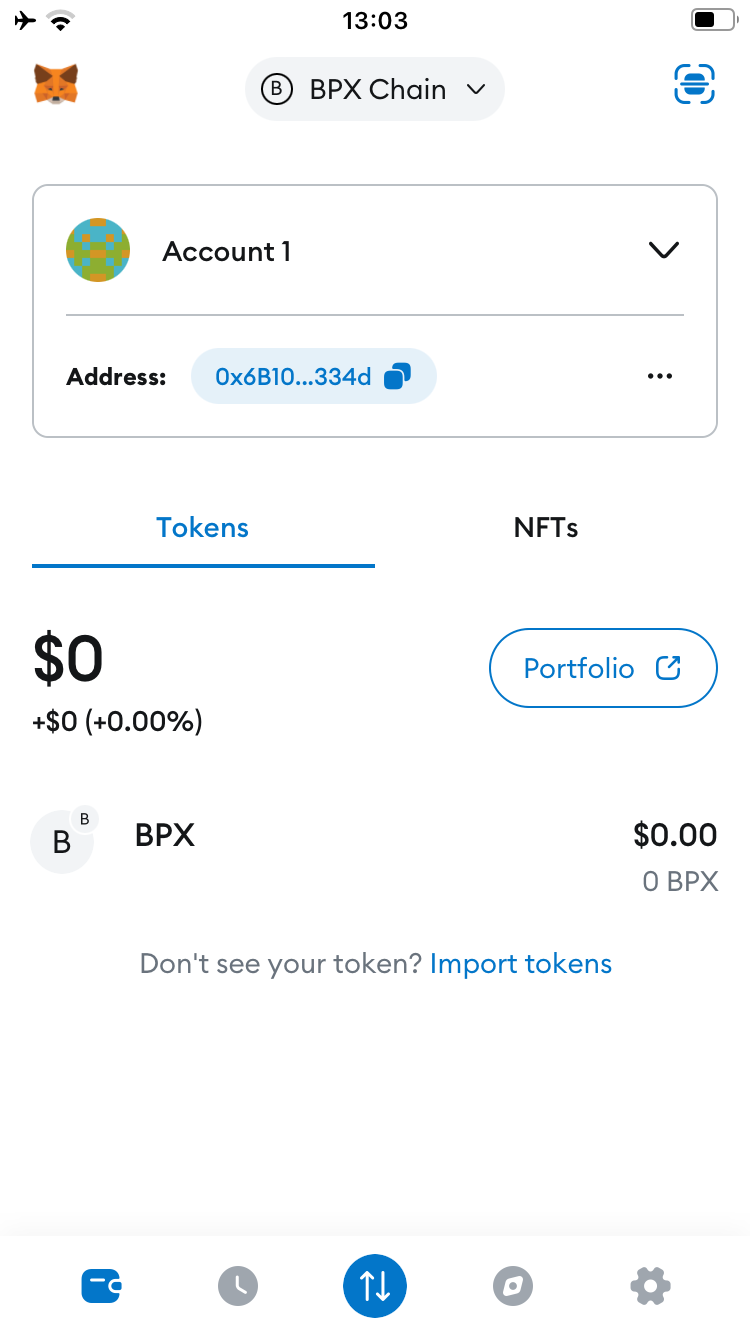
6\. Your wallet is now ready to use.
[](https://docs.bpxchain.cc/uploads/images/gallery/2024-11/AhCXbhwtI9K1BGBT-metamask-mobile8.PNG)
# Installing and running BPX full node on Windows
1\. Download the EXE installers for the latest releases of the **[Execution Client](https://github.com/bpx-chain/bpx-execution-client/releases)** and **[Beacon Client](https://github.com/bpx-chain/bpx-beacon-client/releases)**.
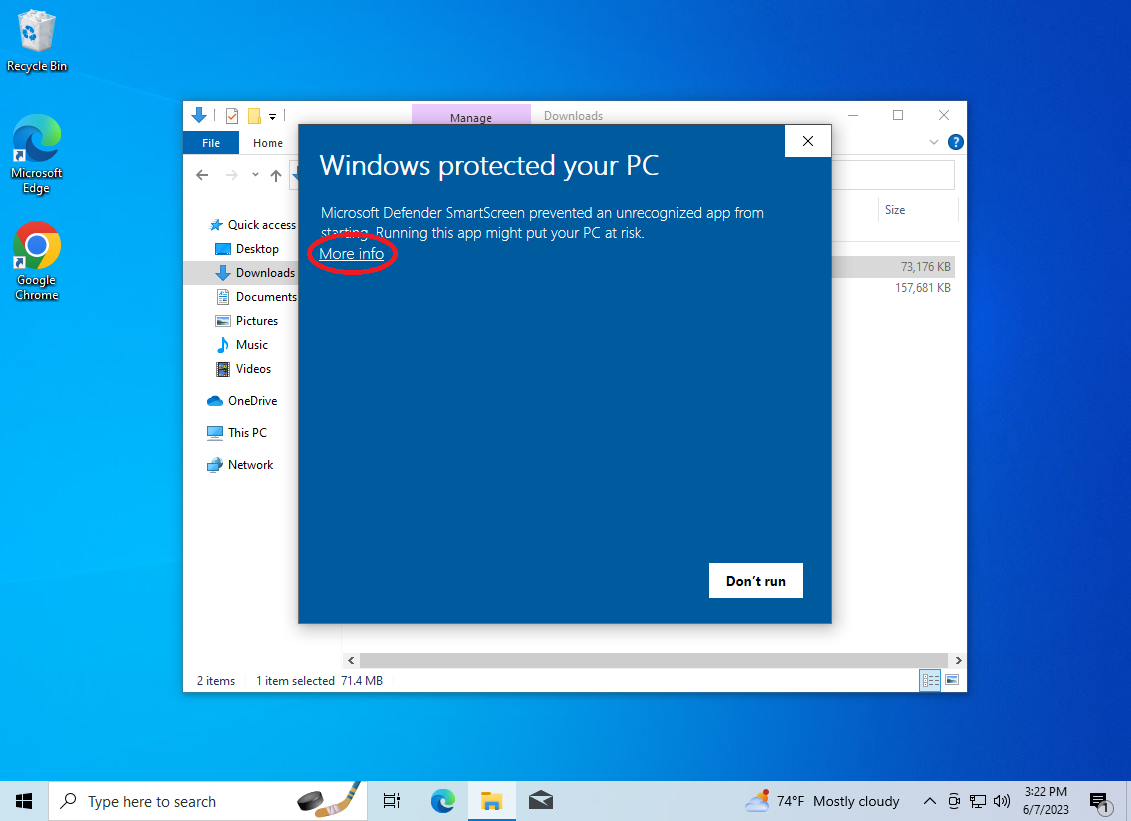
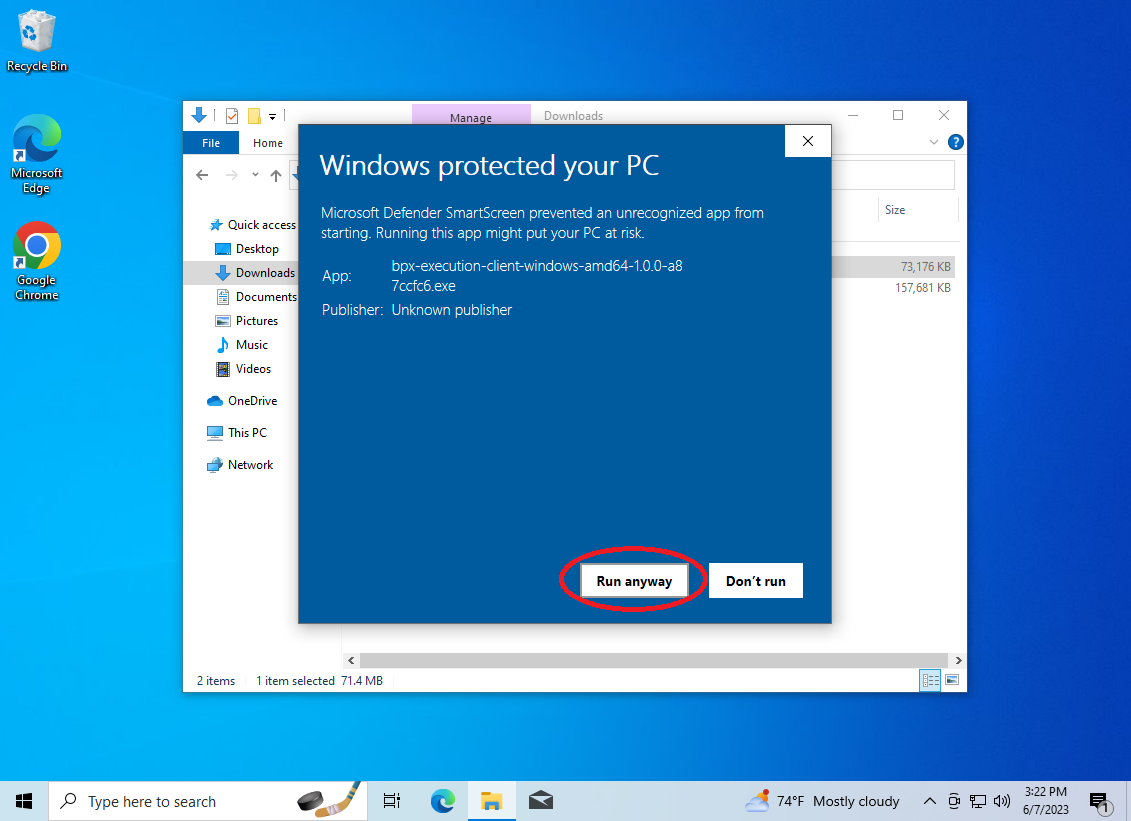
2\. Run the **Execution Client** installer first. Depending on your Windows version, different warnings may appear. In these cases, click "**More info**", then select "**Run anyway**", and "**Yes**".
[](https://docs.bpxchain.cc/uploads/images/gallery/2023-06/cN3FCMRV0dXWVPsB-virtualbox-win10-07-06-2023-15-22-29.png)
[](https://docs.bpxchain.cc/uploads/images/gallery/2023-06/qr3rt2trR5P6HWWF-virtualbox-win10-07-06-2023-15-22-58.png)
[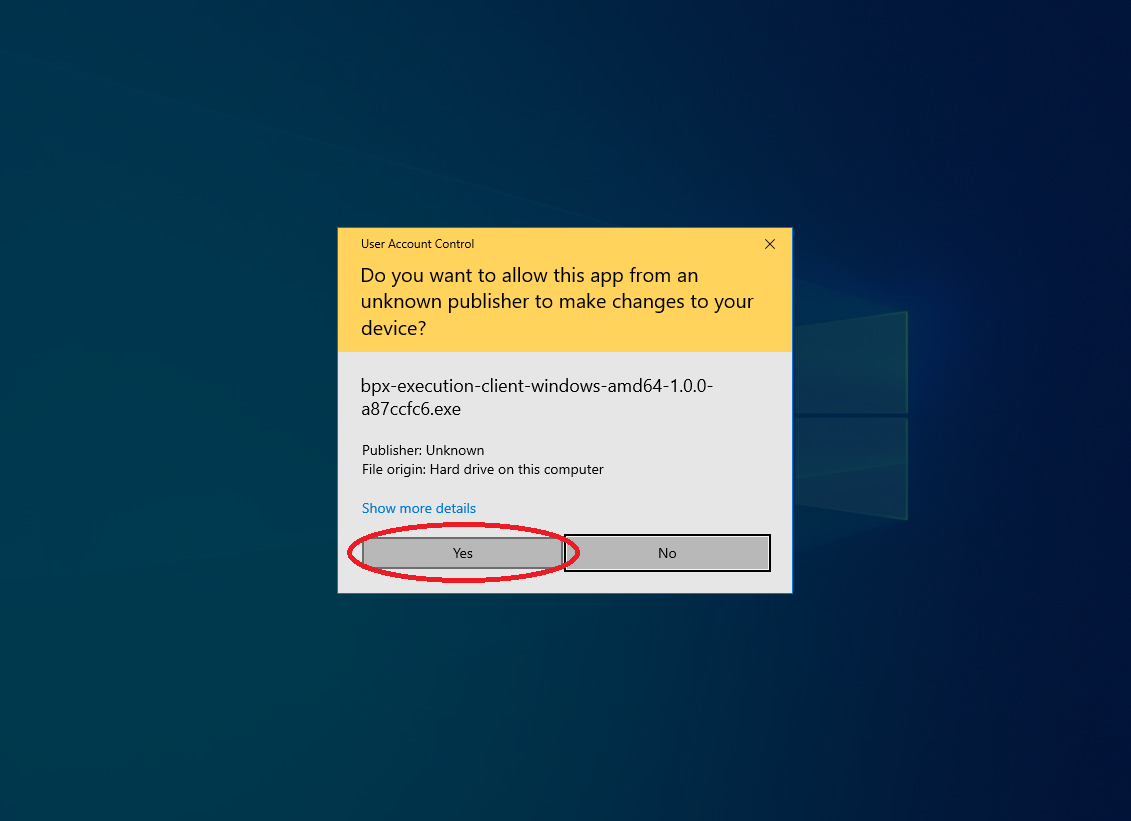](https://docs.bpxchain.cc/uploads/images/gallery/2023-06/iuS3vkSWjBvKYD86-virtualbox-win10-07-06-2023-15-24-22.png)
3\. Follow all the installer steps by clicking "**I Agree**", "**Next**" and "**Install**". Once the installation process is complete, close the installer.
[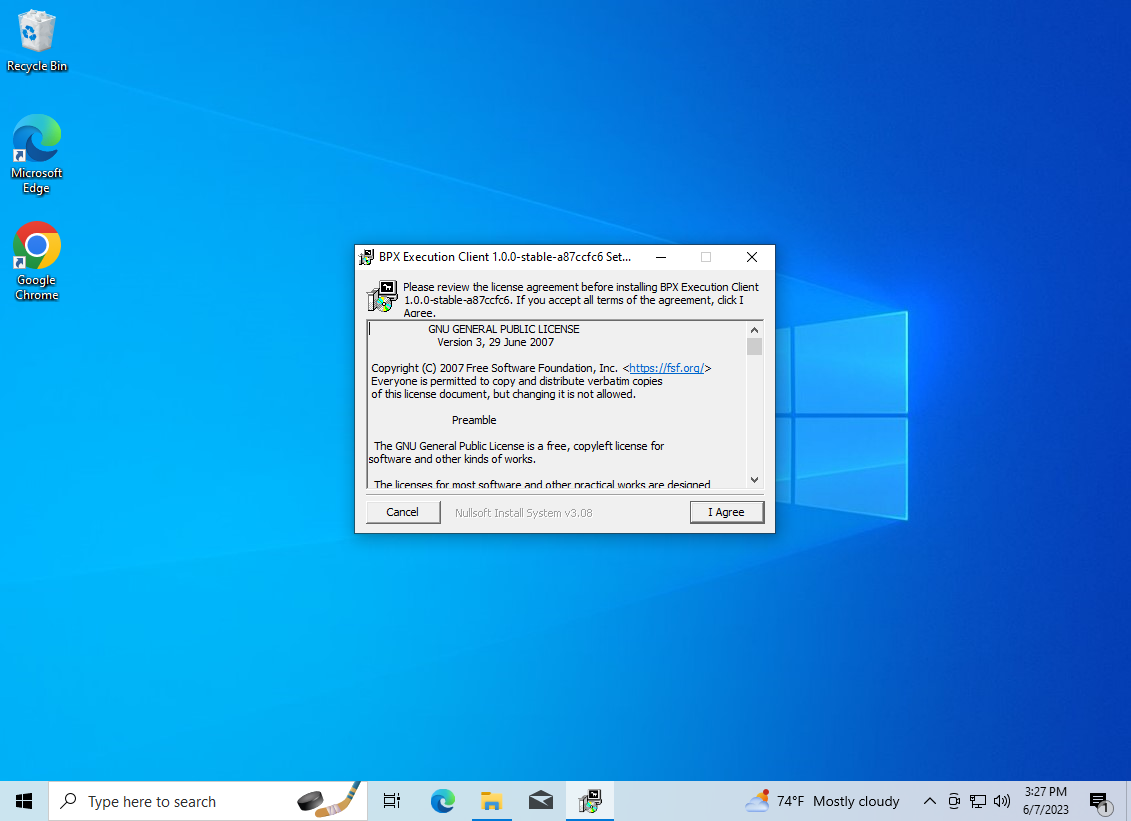](https://docs.bpxchain.cc/uploads/images/gallery/2023-06/xuphBC6JFF7Al8Lb-virtualbox-win10-07-06-2023-15-27-05.png)
[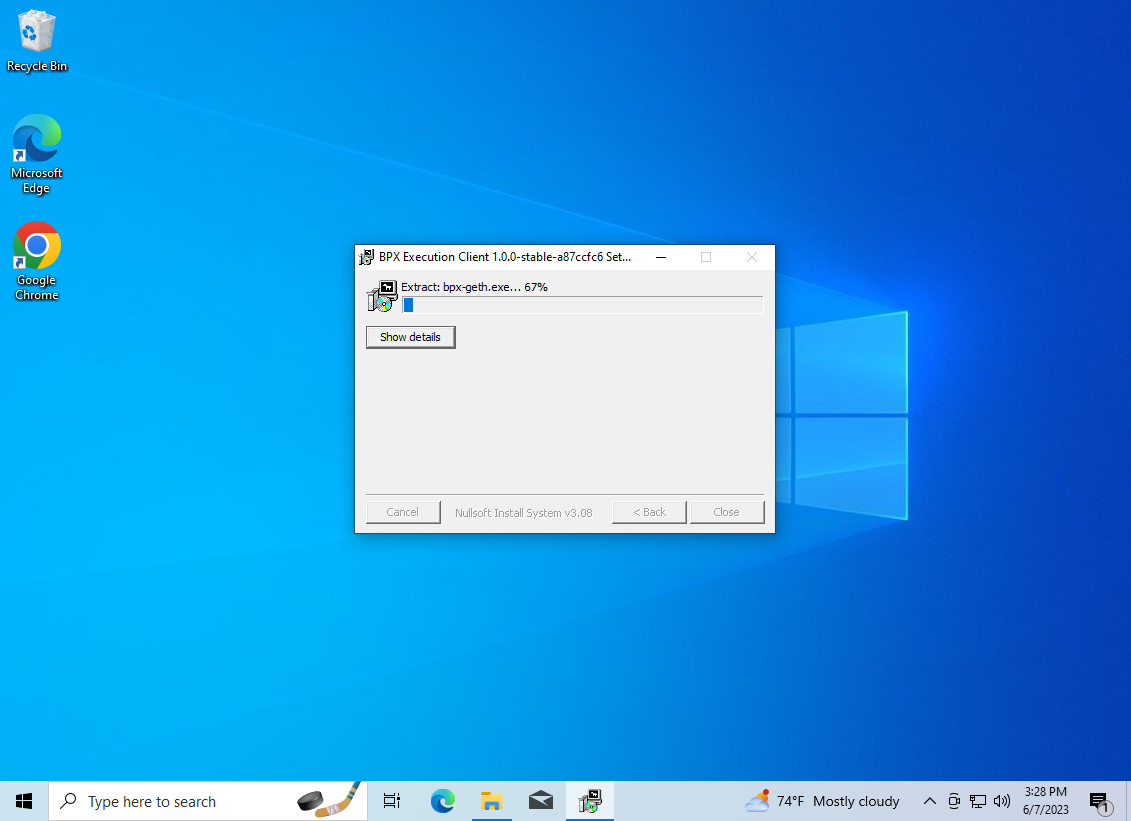](https://docs.bpxchain.cc/uploads/images/gallery/2023-06/ENqEJfOTTI8xQ7cN-virtualbox-win10-07-06-2023-15-28-06.png)
4\. A shortcut to the **BPX Execution Client** will be created in the Start Menu. Launch it from there.
[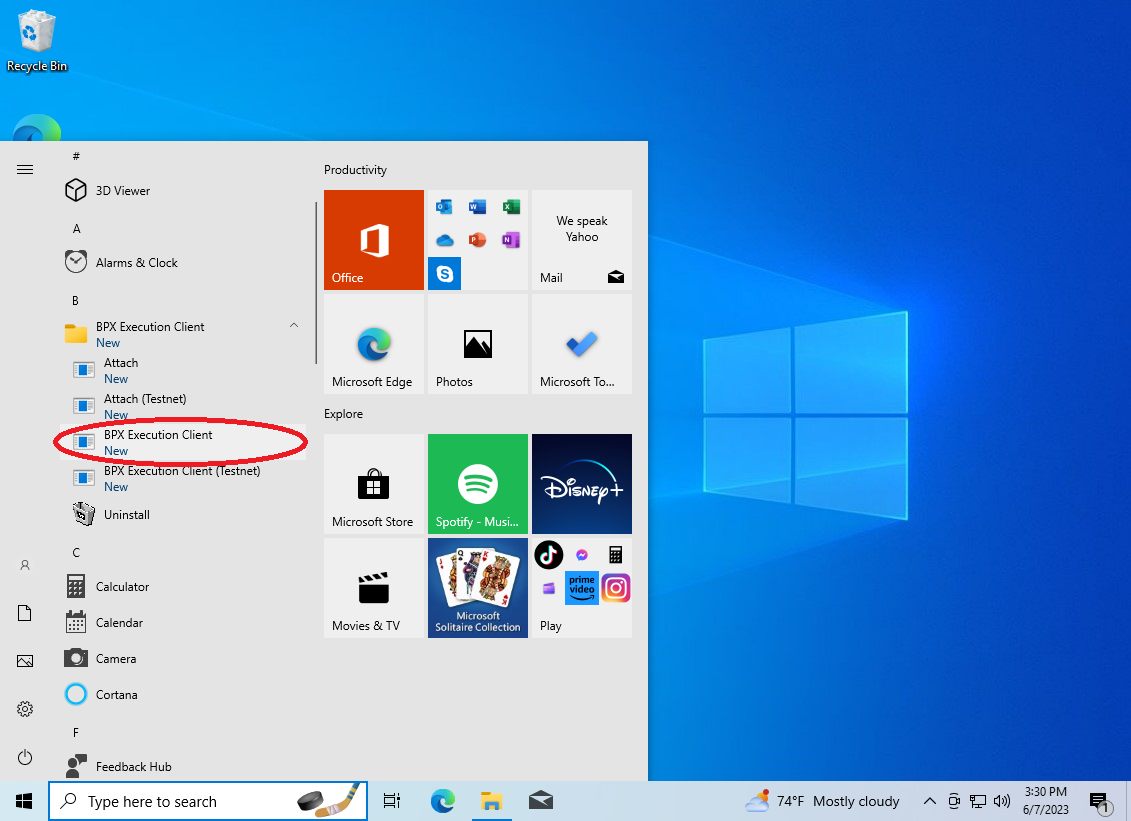](https://docs.bpxchain.cc/uploads/images/gallery/2023-06/pLXELv47WTfEBO7s-virtualbox-win10-07-06-2023-15-30-15.png)
5\. Allow the Windows Firewall to open the execution client port. The execution client will start, and you should see its console window.
[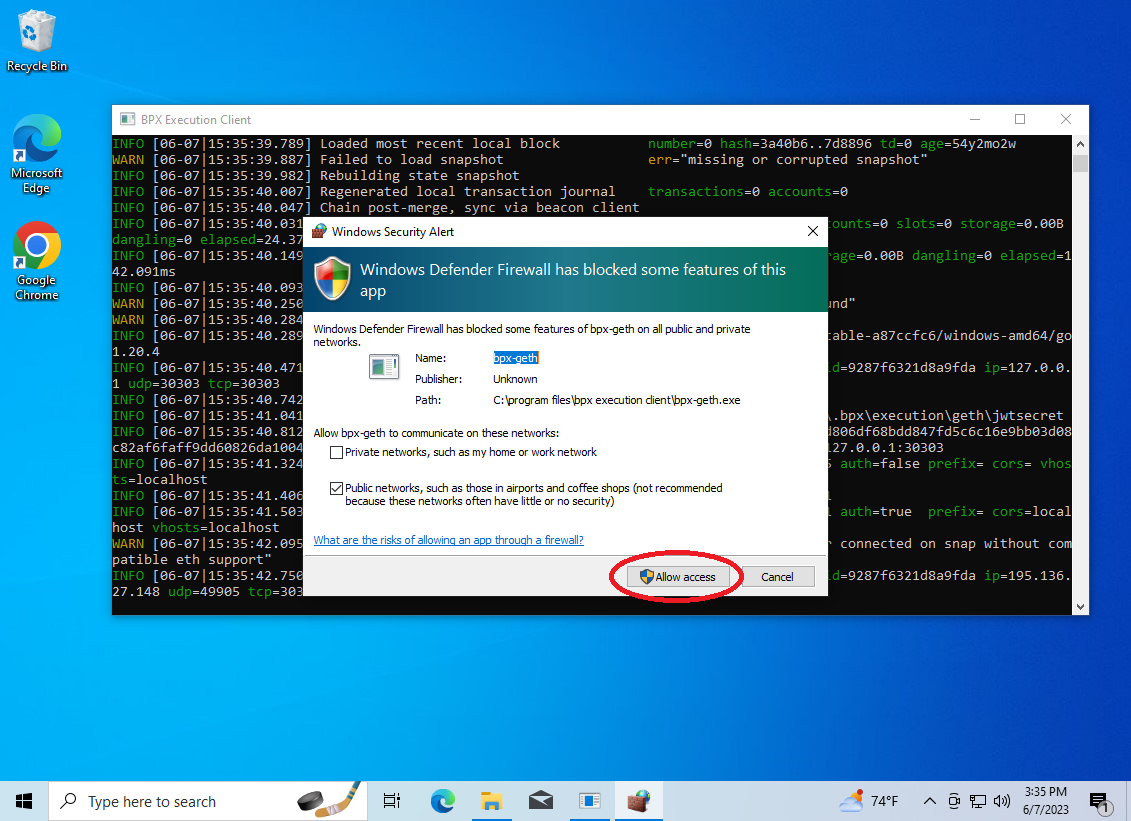](https://docs.bpxchain.cc/uploads/images/gallery/2023-06/ZVmu1FPViOP4IdOm-virtualbox-win10-07-06-2023-15-35-47.png)
[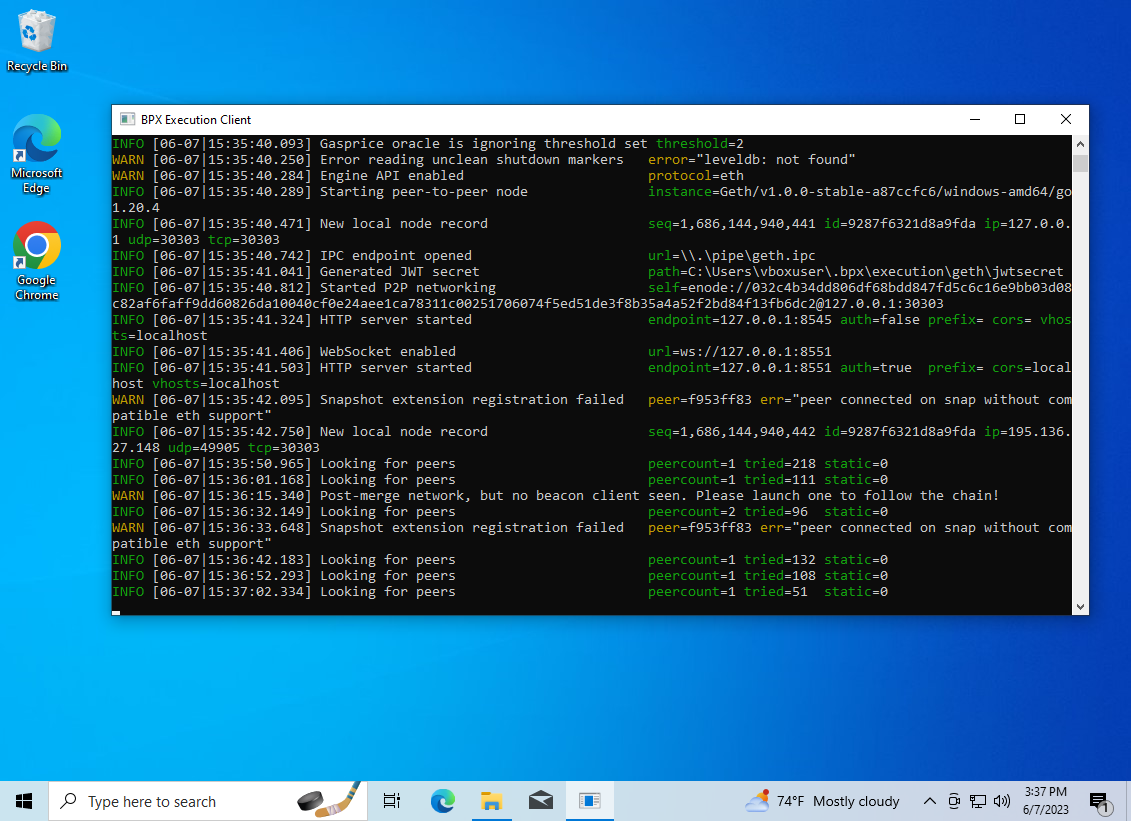](https://docs.bpxchain.cc/uploads/images/gallery/2023-06/SQw66lQAin12lgQ0-virtualbox-win10-07-06-2023-15-35-59.png)
6\. Now run the **Beacon Client** installer. Navigate through the Microsoft Defender pop-ups as before.
7\. Accept the license agreement and proceed through the subsequent installation steps.
[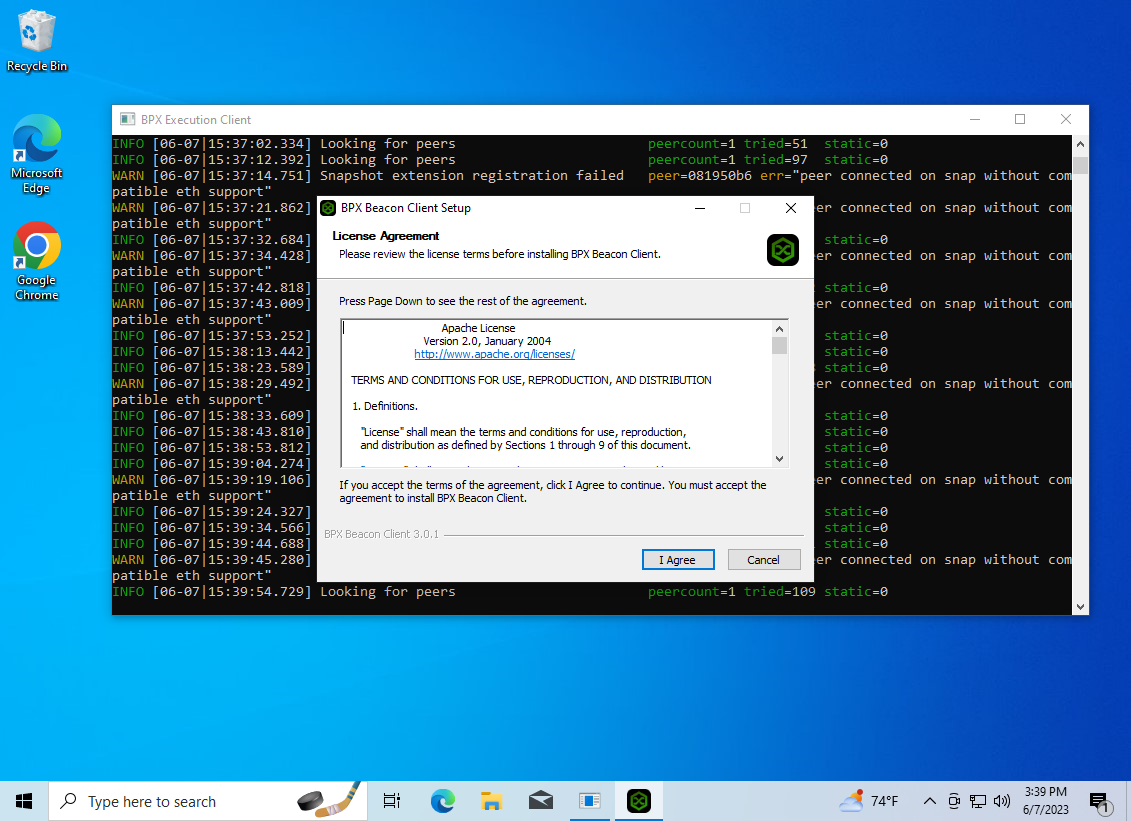](https://docs.bpxchain.cc/uploads/images/gallery/2023-06/1LJztC6ZHwoBADjl-virtualbox-win10-07-06-2023-15-39-55.png)
[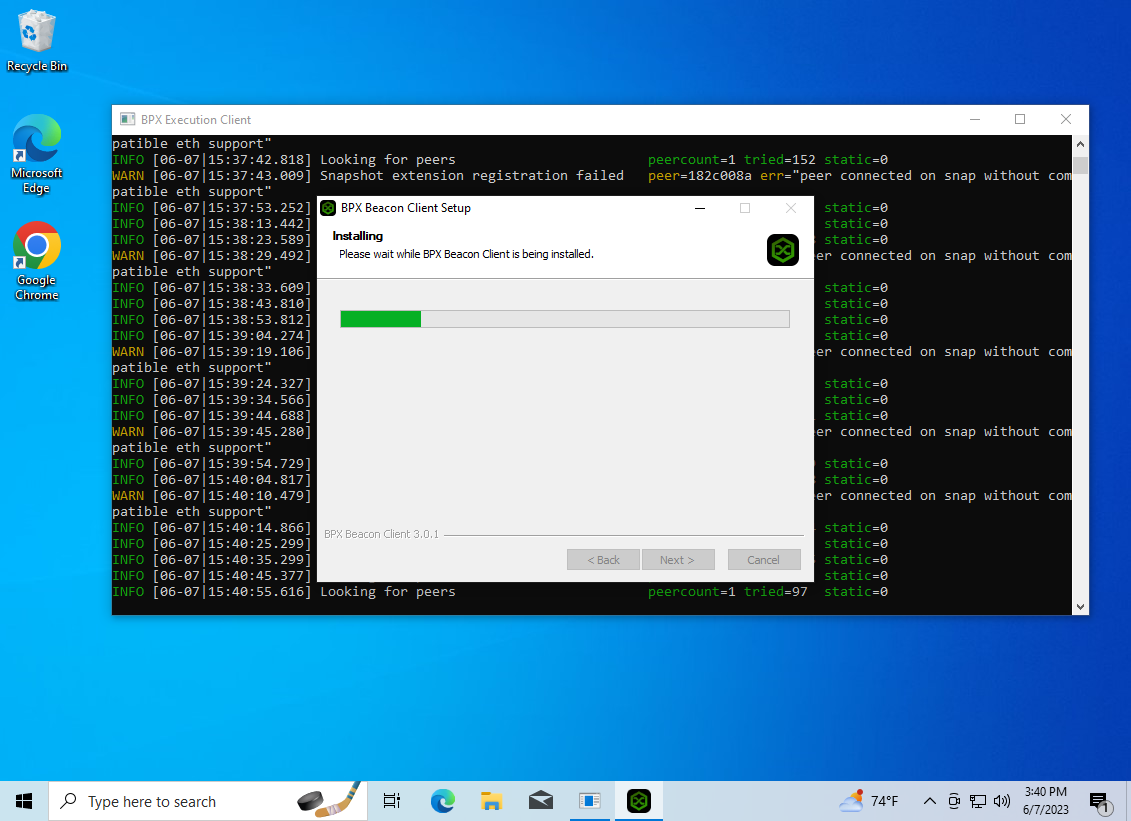](https://docs.bpxchain.cc/uploads/images/gallery/2023-06/DFloLvXOfAUQY3Wa-virtualbox-win10-07-06-2023-15-41-00.png)
8\. Once the installation is complete, click the "**Get Started**" button.
[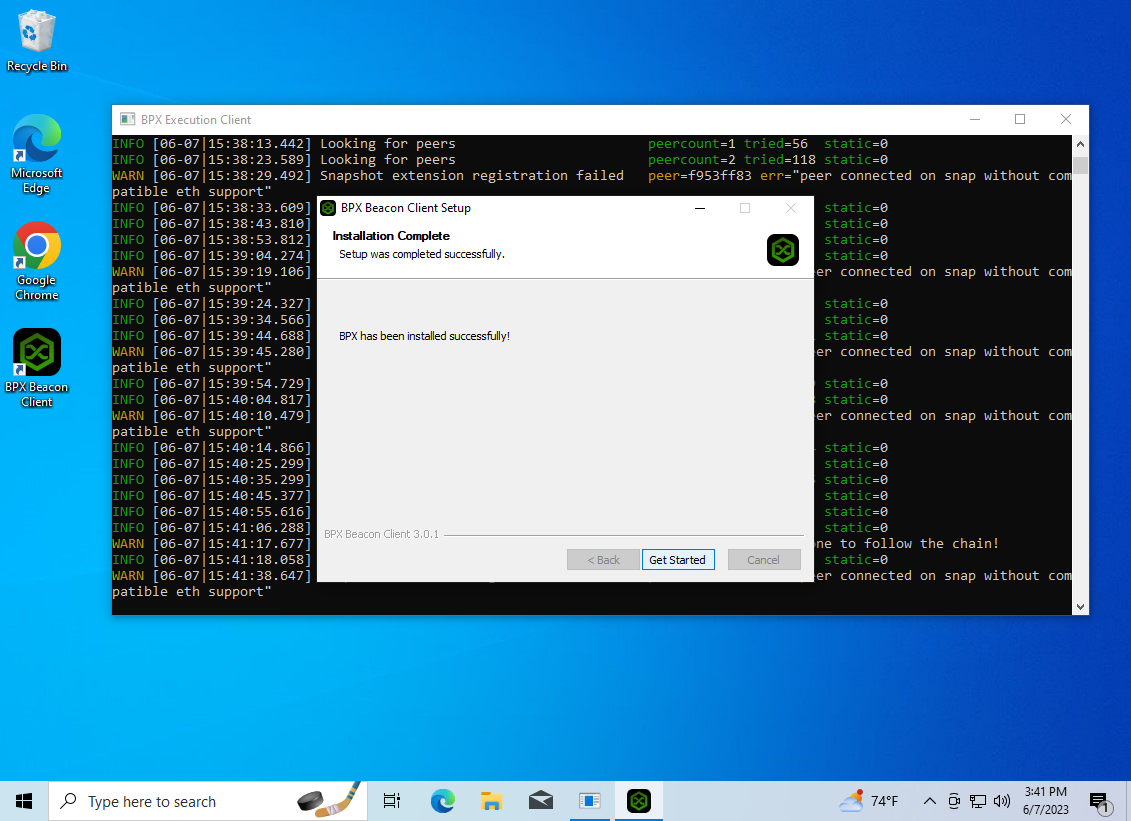](https://docs.bpxchain.cc/uploads/images/gallery/2023-06/ZTODY9NcBSxIdlh8-virtualbox-win10-07-06-2023-15-41-44.png)
9\. Allow to open the required port as before.
[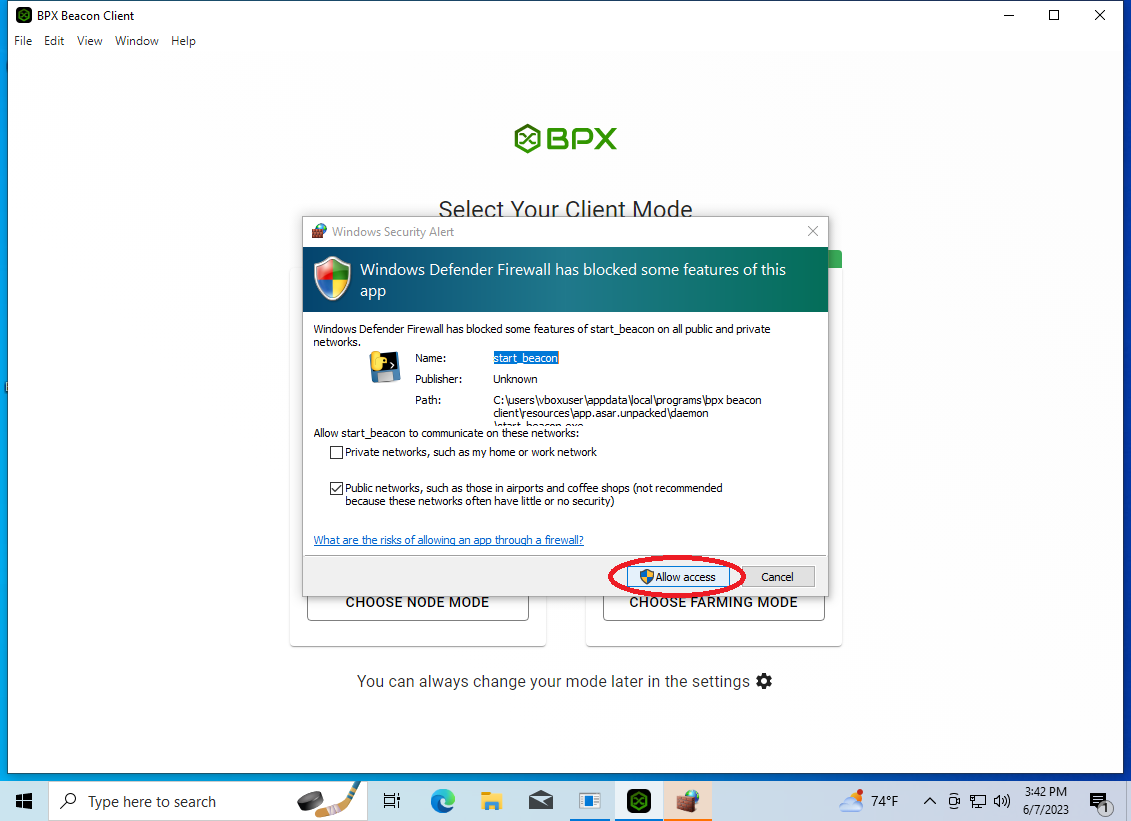](https://docs.bpxchain.cc/uploads/images/gallery/2023-06/SNMKudoFWLv2hnvo-virtualbox-win10-07-06-2023-15-42-57.png)
10\. Beacon Client GUI will be launched. Select the **Node** mode.
[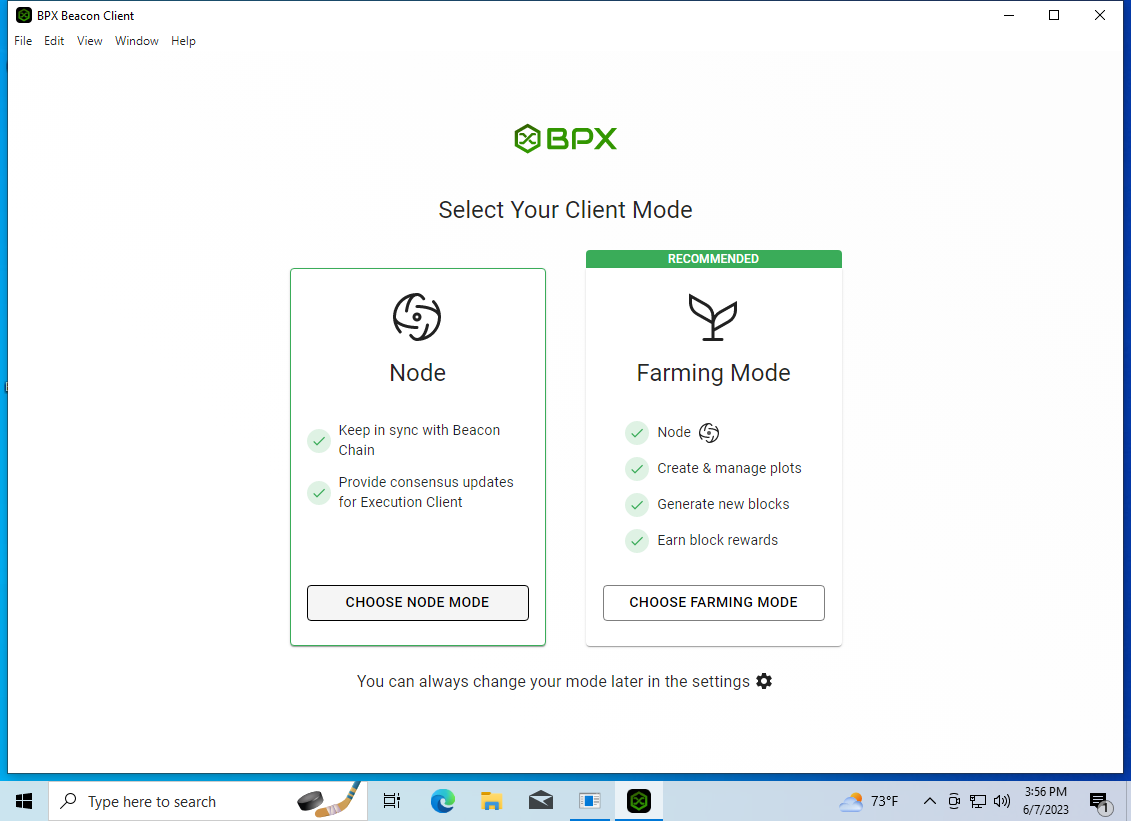](https://docs.bpxchain.cc/uploads/images/gallery/2023-06/dwjACt1J8NX0bt5Q-virtualbox-win10-07-06-2023-15-56-13.png)
11\. At this point, both clients will begin synchronizing with the network. This process may take several hours or even days.
[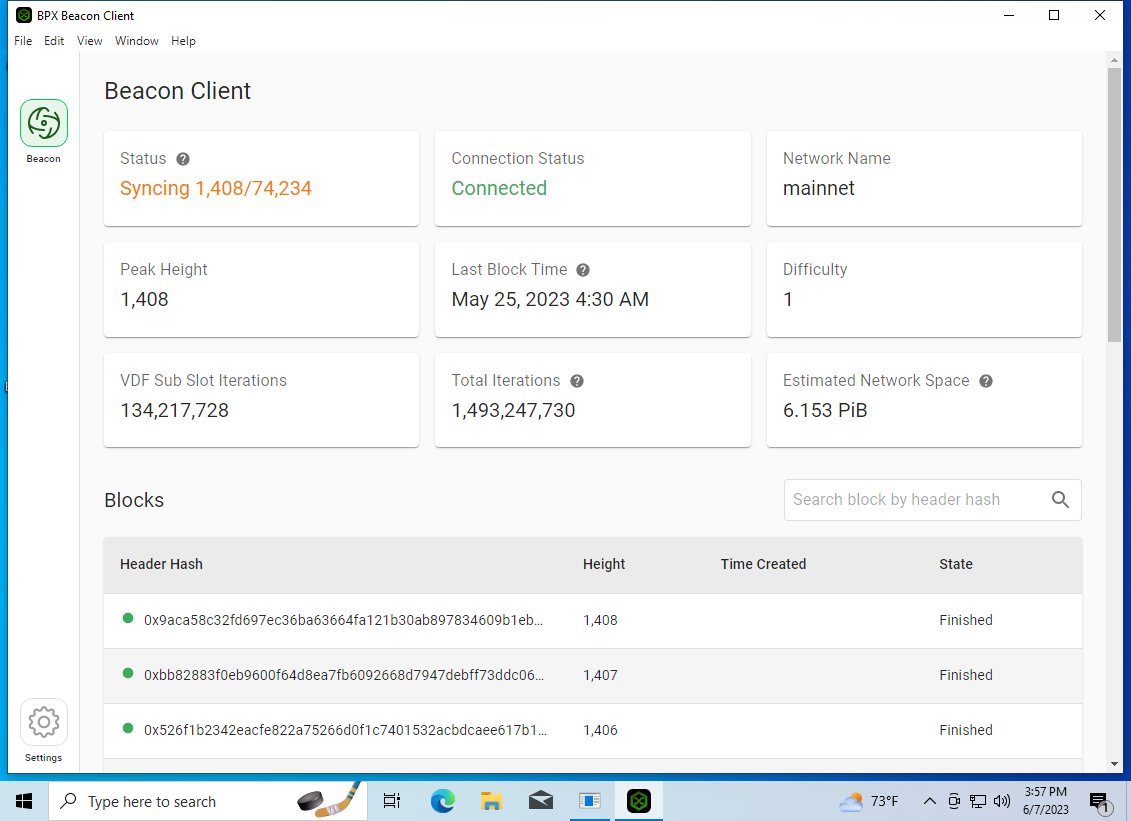](https://docs.bpxchain.cc/uploads/images/gallery/2023-06/eEVgdBV1HbLI7WLQ-virtualbox-win10-07-06-2023-15-57-39.png)
[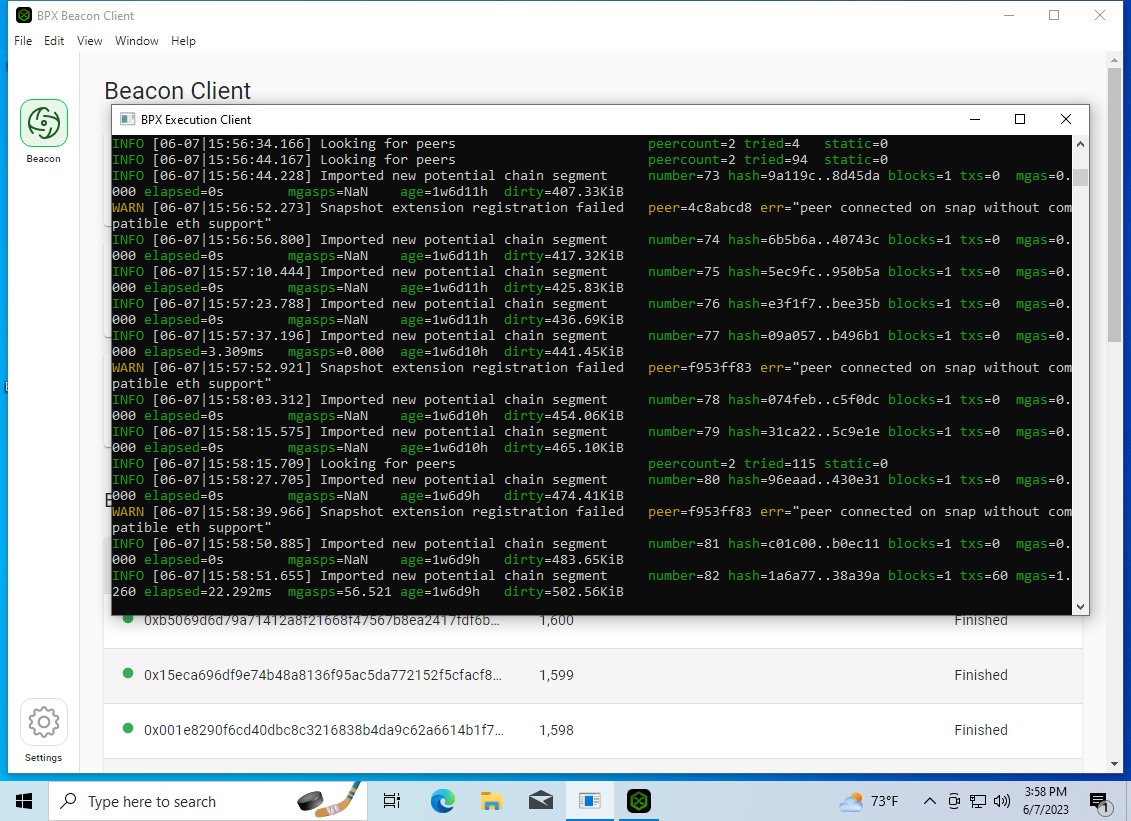](https://docs.bpxchain.cc/uploads/images/gallery/2023-06/UjXUtsLrGpJxNjxD-virtualbox-win10-07-06-2023-15-58-58.png)
12\. Once synchronization is complete, your full node will be ready to operate.
[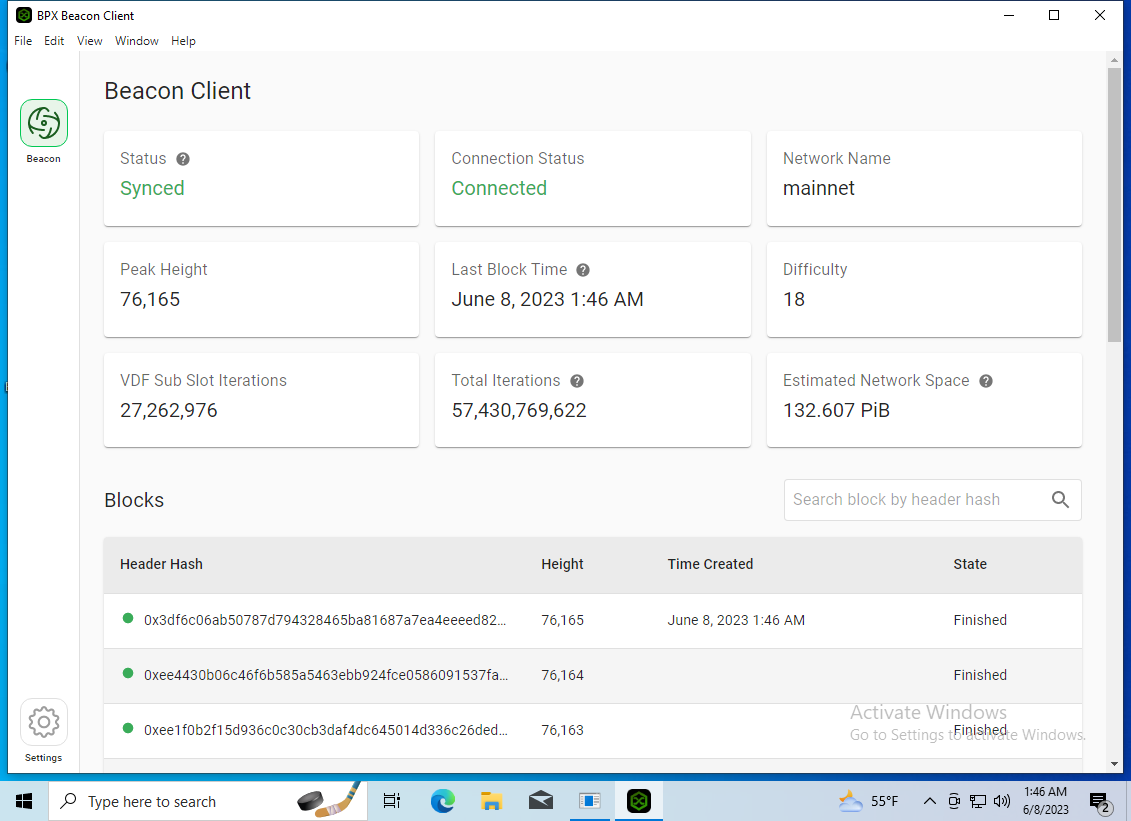](https://docs.bpxchain.cc/uploads/images/gallery/2023-06/dqJne2CC2hozzwbB-virtualbox-win10-08-06-2023-01-46-36.png)
Never stop the **Execution Client** by closing the console window. Instead, use the **Control + C** shortcut and wait for the client to save all data to disk and shut down gracefully.
[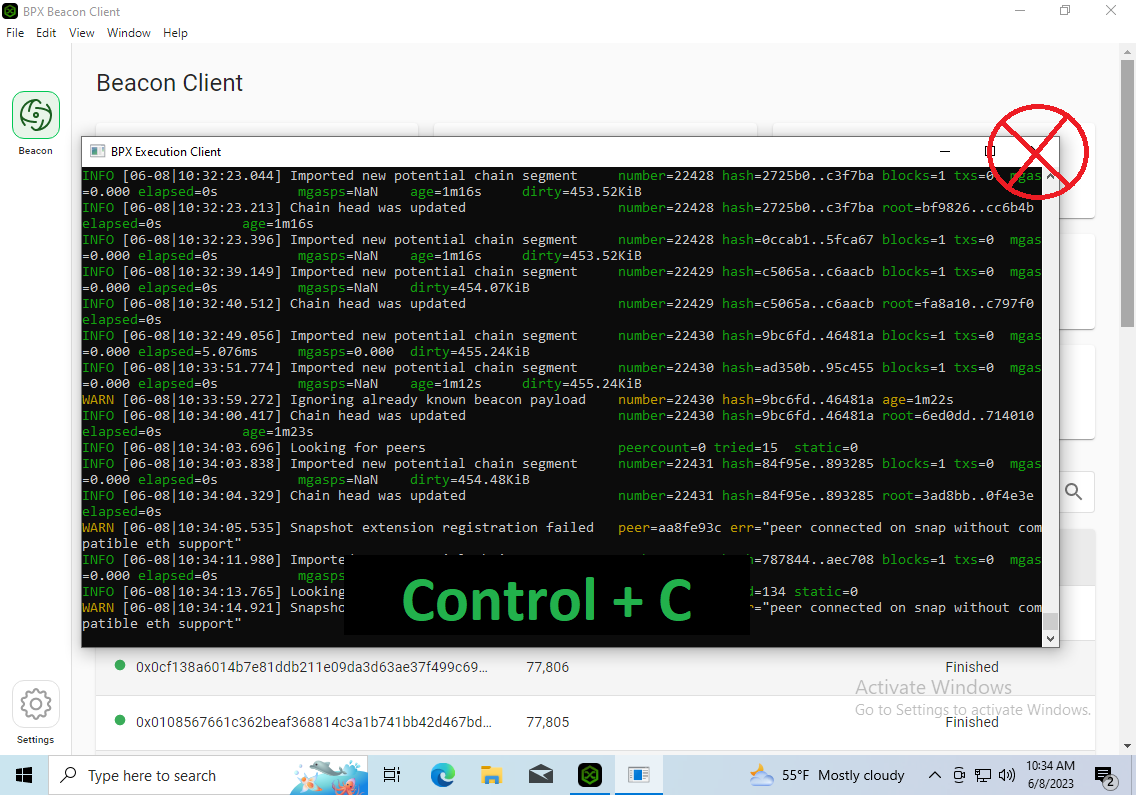](https://docs.bpxchain.cc/uploads/images/gallery/2023-06/wq6Ezk8ksgqEiqJN-virtualbox-win10-08-06-2023-10-34-18.png)
# Installing and running BPX full node on Debian / Ubuntu
1. Log in as root. Use **wget** to download the DEB packages for the latest releases of the **[Execution Client](https://github.com/bpx-chain/bpx-execution-client/releases)** and **[Beacon Client](https://github.com/bpx-chain/bpx-beacon-client/releases)**. Replace **X.X.X** with the latest versions tags.
```bash
wget "https://github.com/bpx-chain/bpx-execution-client/releases/download/X.X.X/bpx-execution-client_X.X.X+stable_amd64.deb"
wget "https://github.com/bpx-chain/bpx-beacon-client/releases/download/X.X.X/bpx-beacon-client-cli_X.X.X-1_amd64.deb"
```
[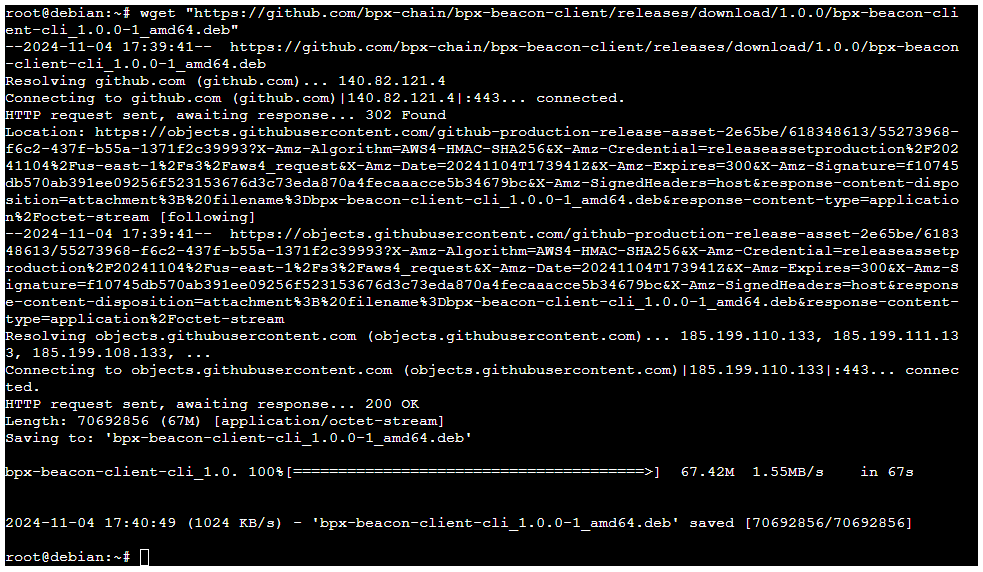](https://docs.bpxchain.cc/uploads/images/gallery/2024-11/EY3NV23TsTGeZY2q-node-debian1.png)
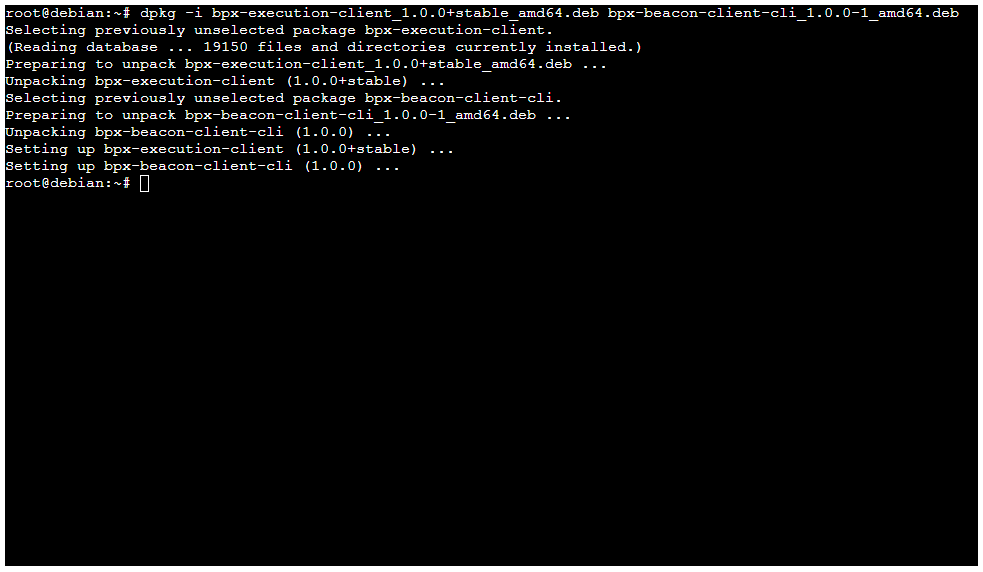
2\. Install both packages. Replace **X.X.X** with the downloaded versions tags.
```bash
dpkg -i bpx-execution-client_X.X.X+stable_amd64.deb bpx-beacon-client-cli_X.X.X-1_amd64.deb
```
[](https://docs.bpxchain.cc/uploads/images/gallery/2024-11/oqqS5qC8rwBHvbxv-node-debian2.png)
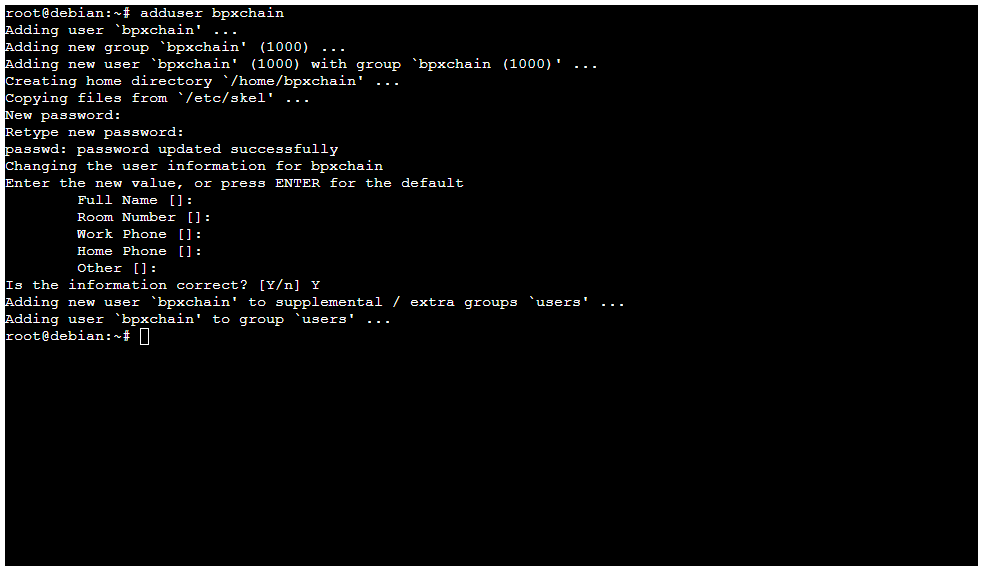
3\. Create a new user account for BPX Chain services.
```bash
adduser bpxchain
```
Set a password for the new account. You can leave the additional information fields empty.
[](https://docs.bpxchain.cc/uploads/images/gallery/2024-11/9kK8etHBytK6aq1t-node-debian3.png)
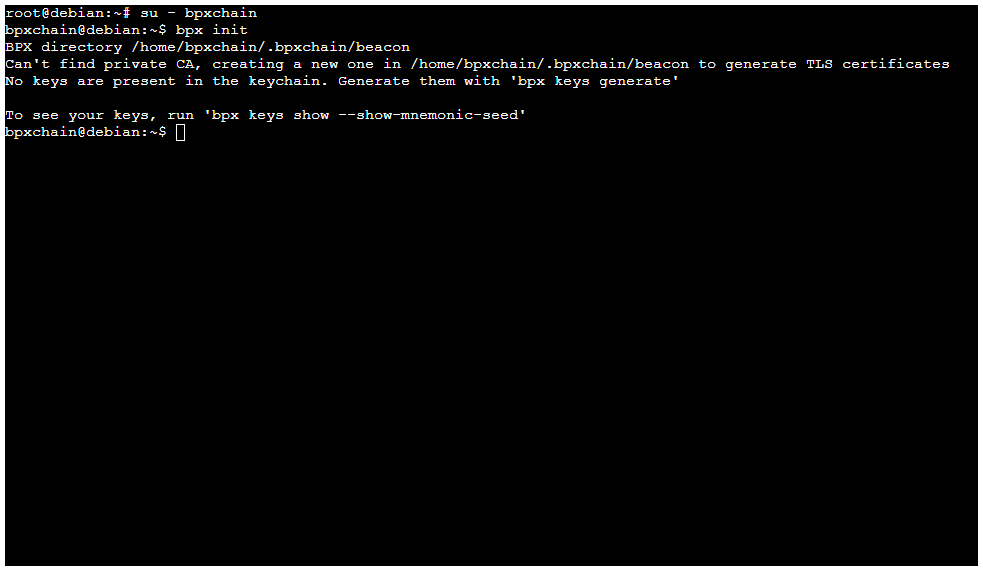
4\. Switch to the newly created account.
```bash
su - bpxchain
```
5\. Initialize the Beacon Client configuration.
```bash
bpx init
```
[](https://docs.bpxchain.cc/uploads/images/gallery/2024-11/U6aLVTRKvaVlB1Zj-node-debian4.png)
6\. Press **Control + D** to log out and return to the root console.
7\. Create a configuration file for the BPX Execution Client **systemd** service using any text editor, for example **nano**:
```bash
nano /etc/systemd/system/bpx-execution.service
```
Insert the following file content:
```
[Unit]
Description=BPX Execution Client
[Service]
Type=simple
User=bpxchain
ExecStart=bpx-geth --http
Restart=always
[Install]
WantedBy=multi-user.target
```
Save the file by pressing **Control + O** and close the editor with **Control + X**.
8\. Follow the same procedure to create a configuration file for the Beacon Client service:
```bash
nano /etc/systemd/system/bpx-beacon.service
```
Insert the following file content:
```
[Unit]
Description=BPX Beacon Client
[Service]
Type=forking
User=bpxchain
ExecStart=bpx start beacon
ExecStop=bpx stop -d all
Restart=always
[Install]
WantedBy=multi-user.target
```
9\. Reload the system services configuration.
```bash
systemctl daemon-reload
```
10\. Enable automatic startup of the BPX Chain services.
```bash
systemctl enable bpx-execution
systemctl enable bpx-beacon
```
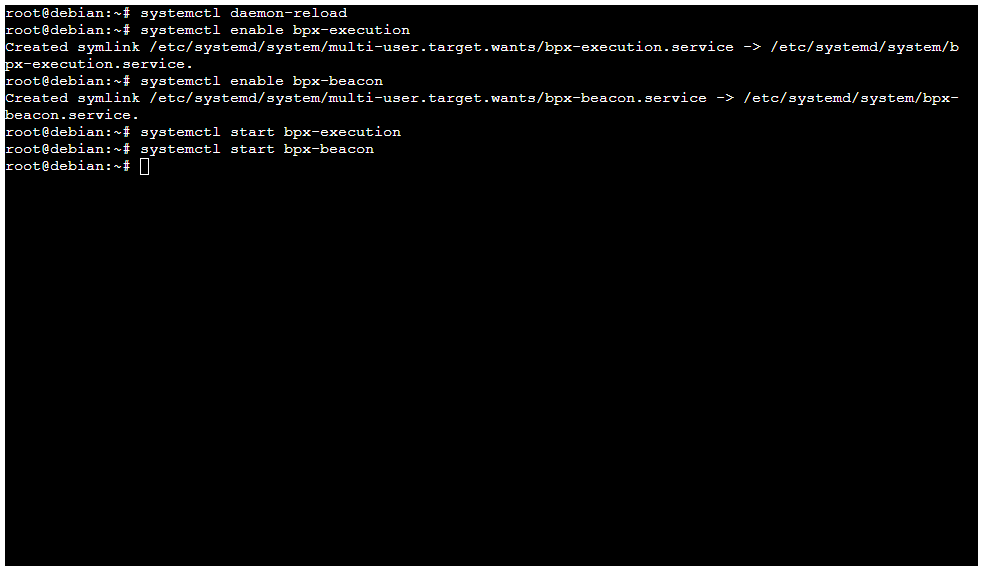
11\. Start both services.
```bash
systemctl start bpx-execution
systemctl start bpx-beacon
```
[](https://docs.bpxchain.cc/uploads/images/gallery/2024-11/auUAk0Tom7bUR6qS-node-debian5.png)
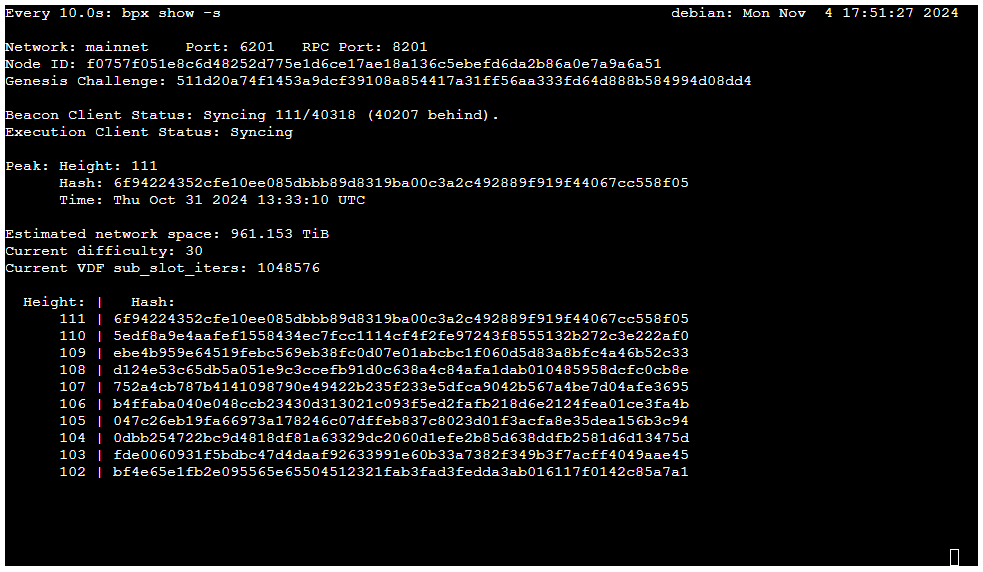
12\. Your full node has just started and will begin the initial synchronization of the blockchain. This process may take several hours or even days. Use the following command to watch the sync status.
```bash
su - bpxchain
watch -n 10 bpx show -s
```
[](https://docs.bpxchain.cc/uploads/images/gallery/2024-11/4CV3cz4TTOK5JIXC-node-debian6.png)
# Farming
# Farming BPX on Windows
1\. To start farming BPX, you need a fully synchronized full node. If you don’t have one, [follow all the steps of this tutorial](https://docs.bpxchain.cc/books/tutorials/page/installing-and-running-bpx-full-node-on-windows), but in the step shown in the screenshot below, choose the **Farming Mode** instead of **Node Mode**. Then, proceed directly to the **Step 4**.
[](https://docs.bpxchain.cc/uploads/images/gallery/2023-06/dwjACt1J8NX0bt5Q-virtualbox-win10-07-06-2023-15-56-13.png)
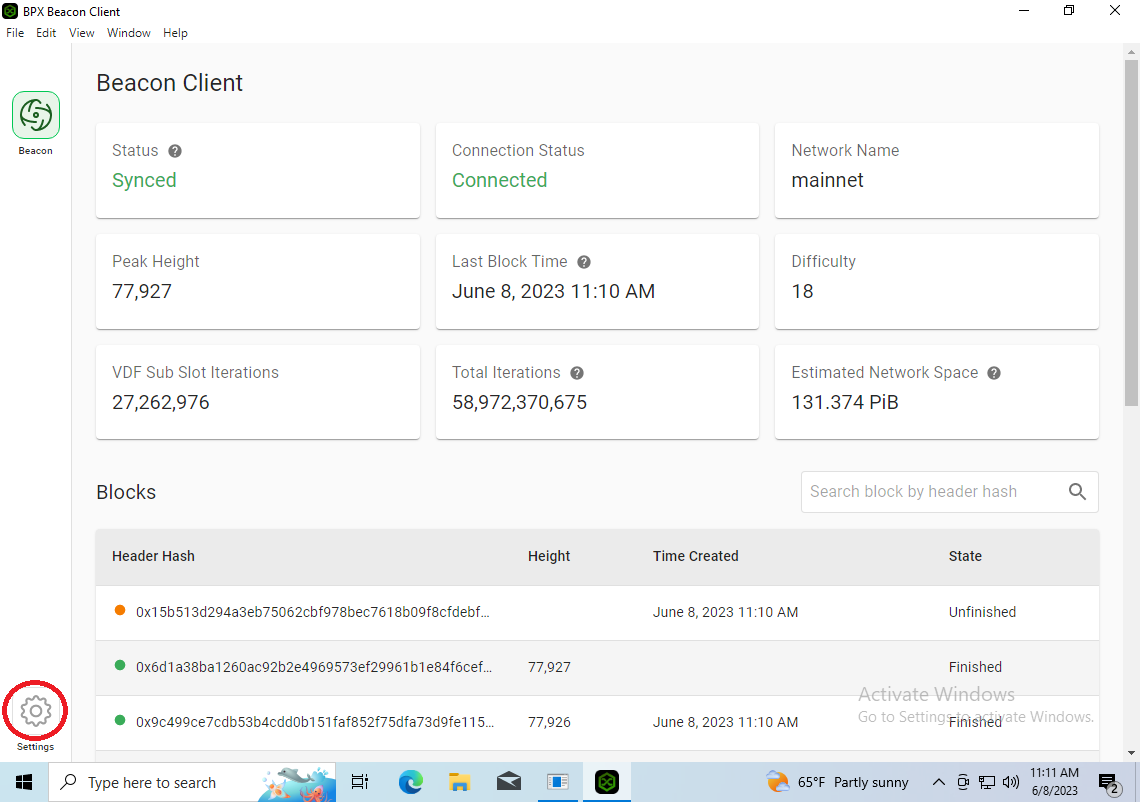
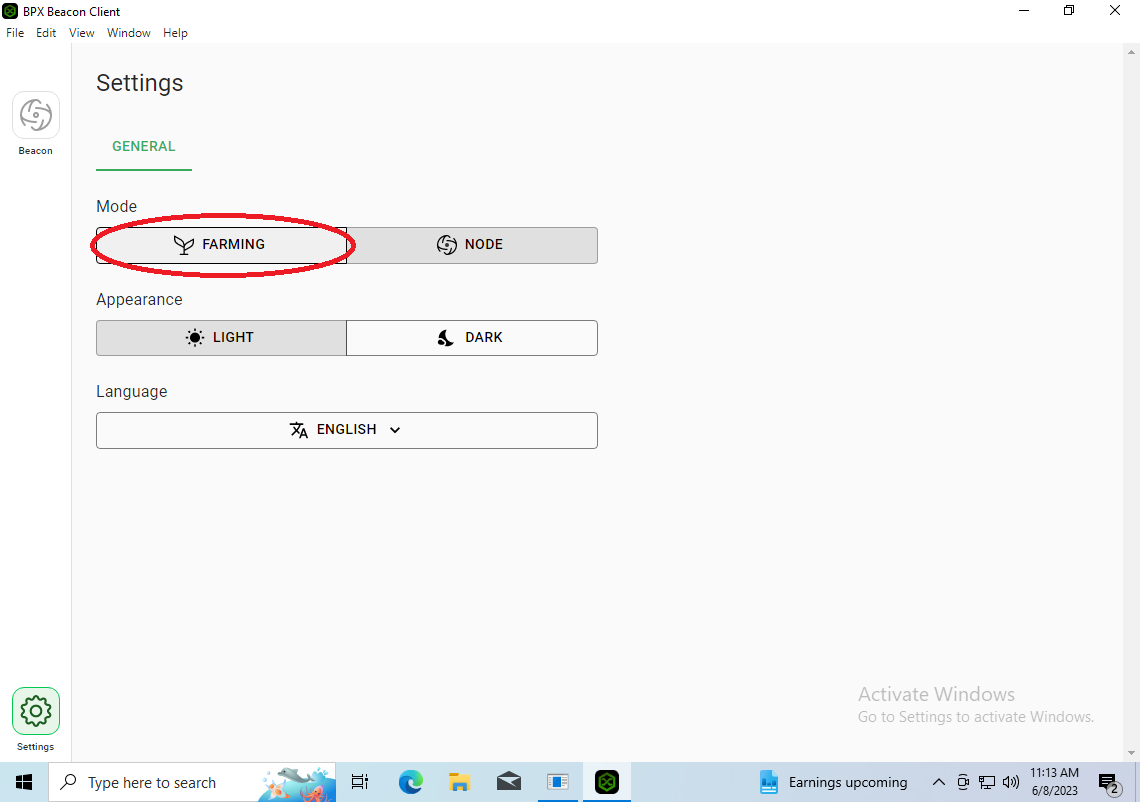
2\. If you already have a running full node, go to **Settings** and change the operating mode to **Farming**.
[](https://docs.bpxchain.cc/uploads/images/gallery/2023-06/IEQnCFZ3ZgDvOxTA-virtualbox-win10-08-06-2023-11-11-06.png)
[](https://docs.bpxchain.cc/uploads/images/gallery/2023-06/suWmqV59H4XkR6vh-virtualbox-win10-08-06-2023-11-13-54.png)
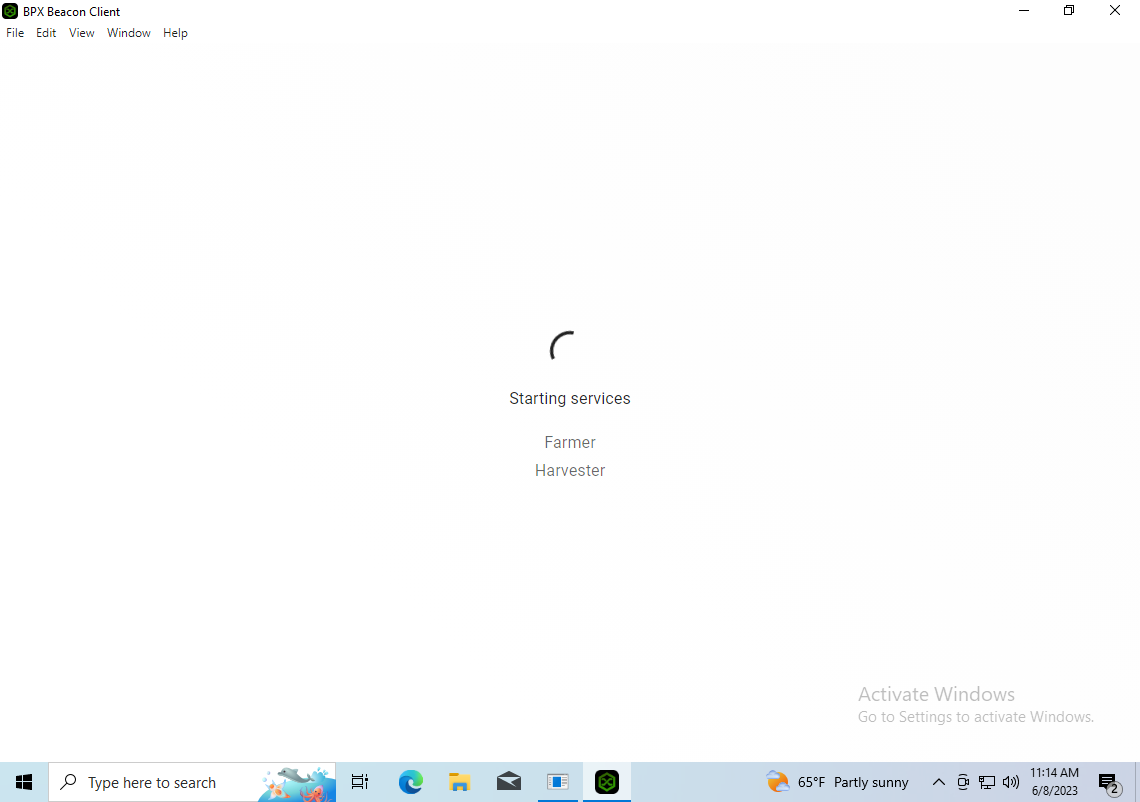
3\. Wait for the additional processes required for farming to start. Allow the Windows Firewall to open the required port, just like during the client installation.
[](https://docs.bpxchain.cc/uploads/images/gallery/2023-06/vbPaLUgClH4fL5CN-virtualbox-win10-08-06-2023-11-14-07.png)
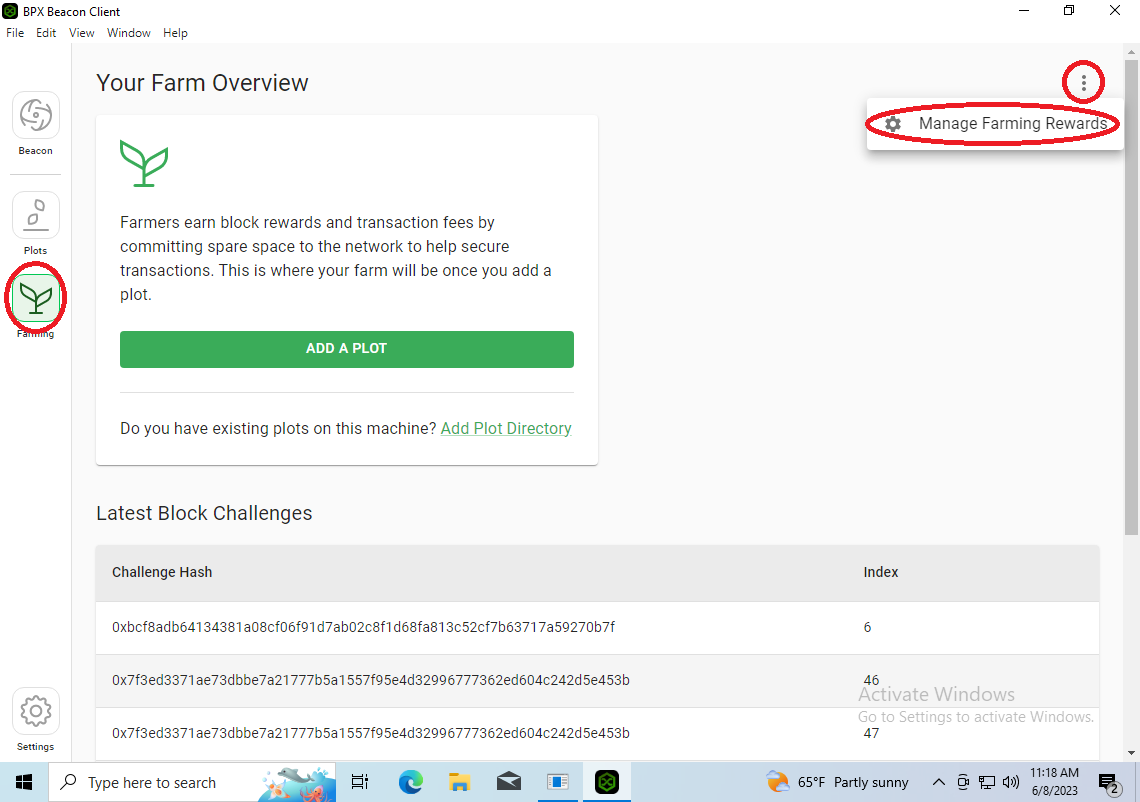
4\. Go to the **Farming** tab. Expand the menu in the upper right corner and select "**Manage Farming Rewards**".
[](https://docs.bpxchain.cc/uploads/images/gallery/2023-06/aniZNf1XredtPU2a-virtualbox-win10-08-06-2023-11-18-19.png)
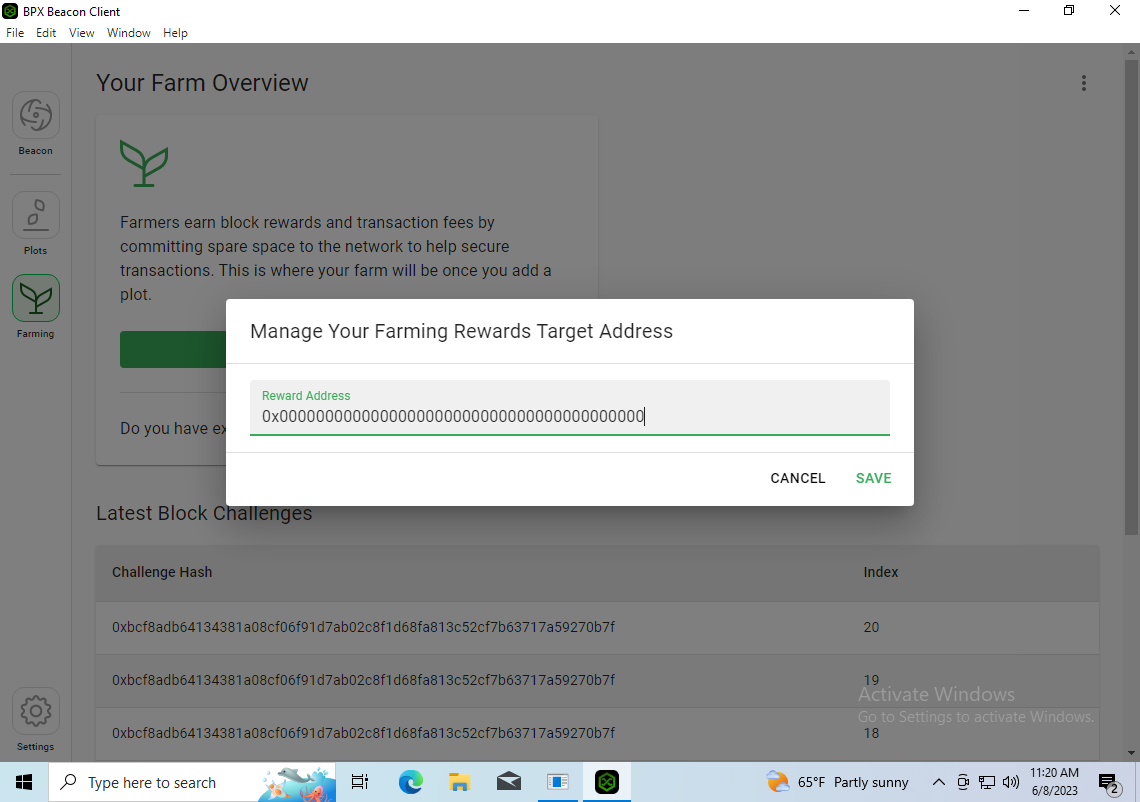
5\. Delete the default zero address and paste your BPX wallet address where you want to receive block rewards, such as your MetaMask wallet address. Save the changes.
[](https://docs.bpxchain.cc/uploads/images/gallery/2023-06/QEj9rSQQAjqbPcmw-virtualbox-win10-08-06-2023-11-20-38.png)
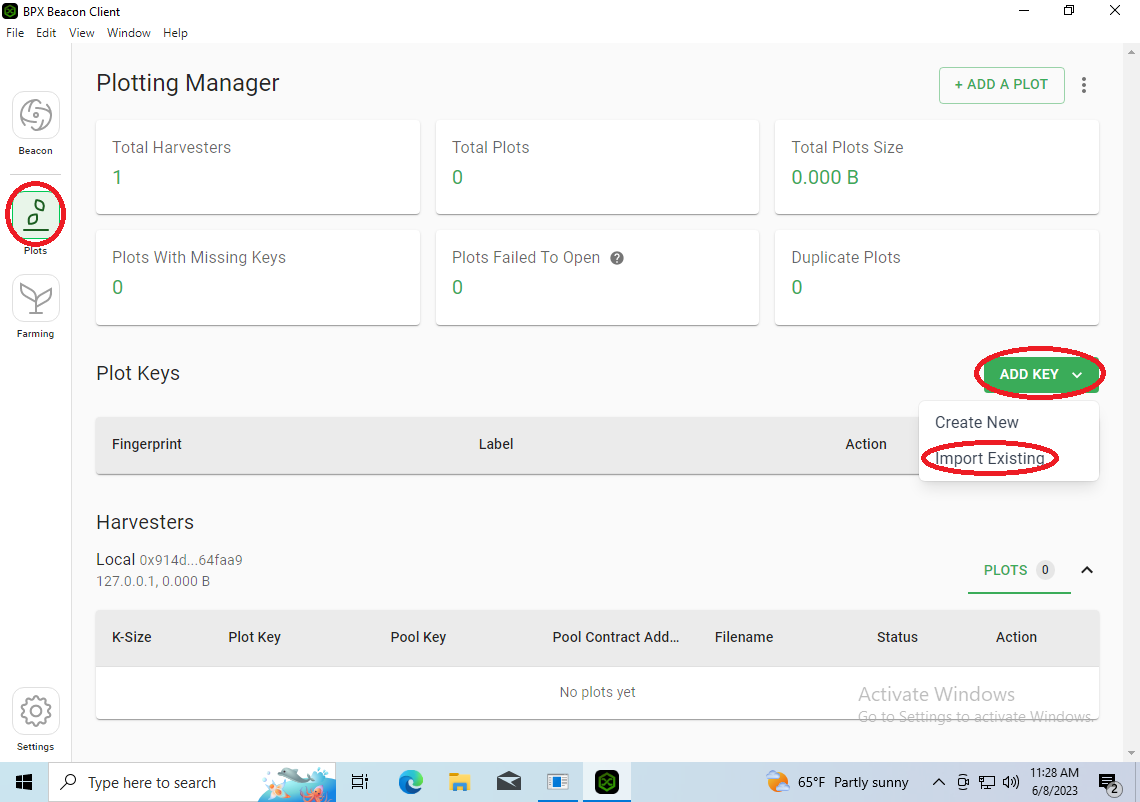
6\. Go to the **Plots** tab. Expand the **ADD KEY** menu and select **Import Existing**.
[](https://docs.bpxchain.cc/uploads/images/gallery/2023-06/NUcrEAzjT3evb897-virtualbox-win10-08-06-2023-11-28-25.png)
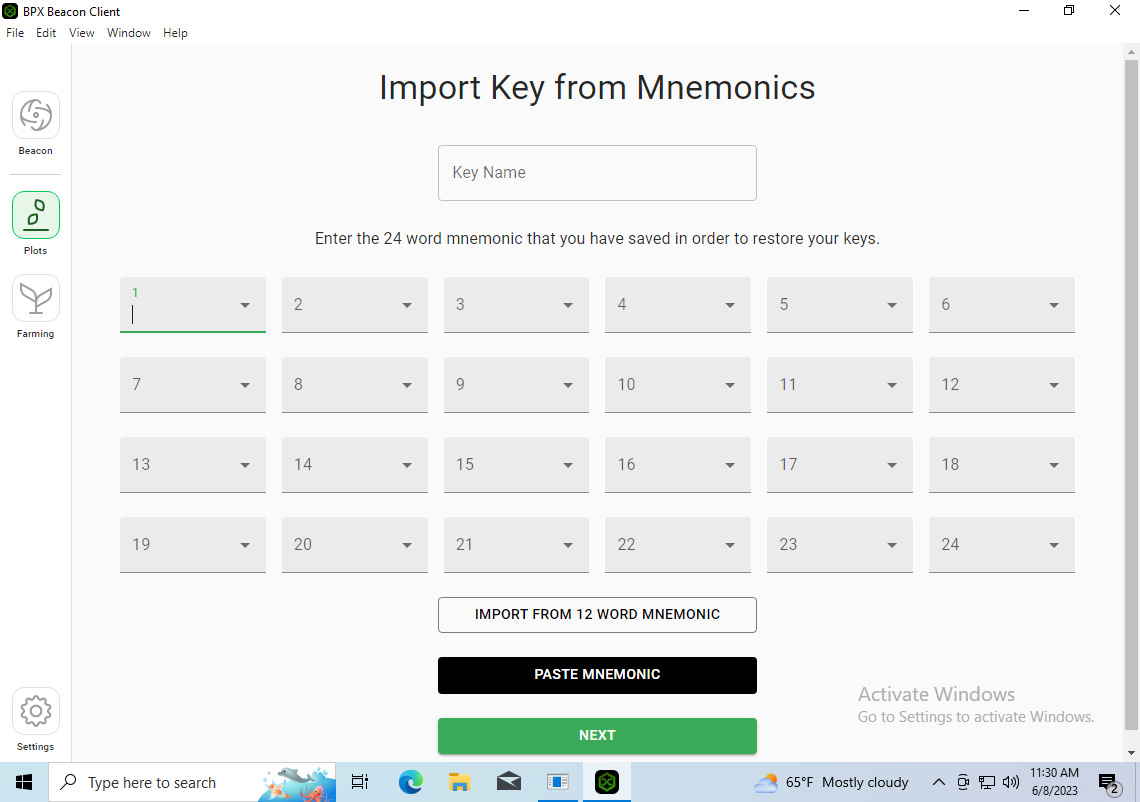
7\. Enter the mnemonics that were used to create your plots and click **Next**.
[](https://docs.bpxchain.cc/uploads/images/gallery/2023-06/aZ1WYKBeXhUAwWQ5-virtualbox-win10-08-06-2023-11-30-09.png)
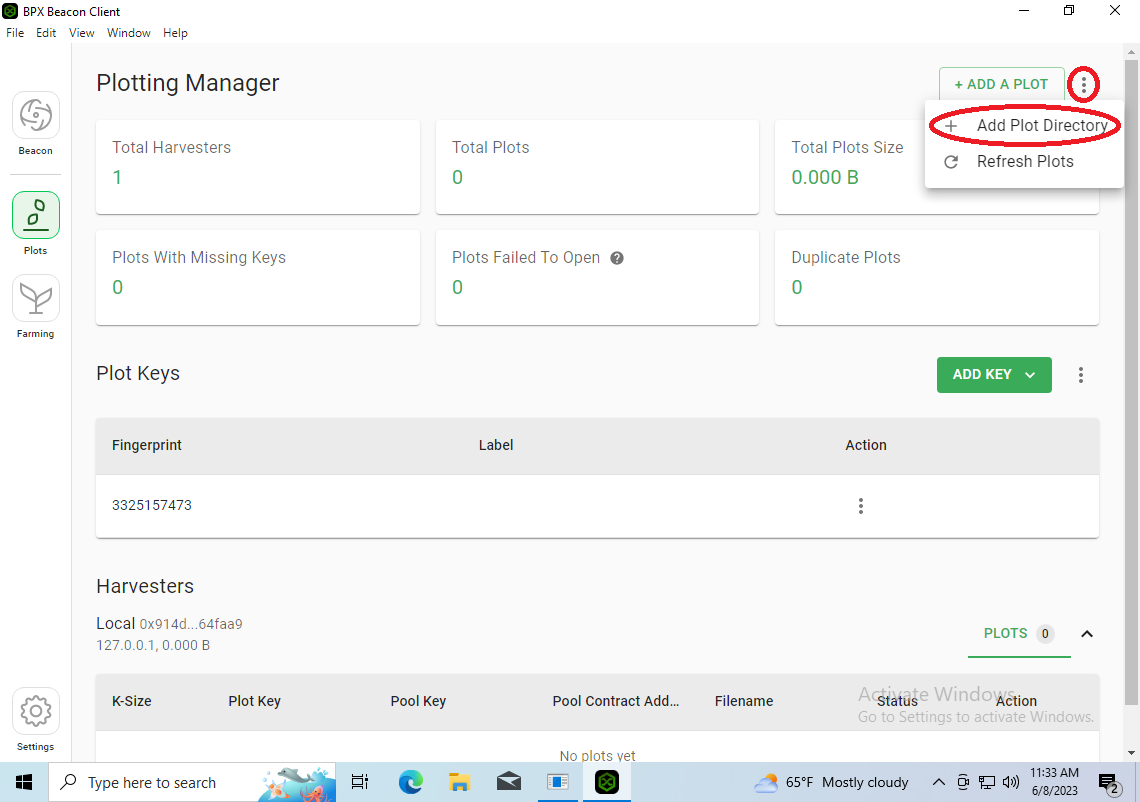
8\. Expand the menu in right top corner and select **Add Plot Directory**.
[](https://docs.bpxchain.cc/uploads/images/gallery/2023-06/vfCPeE8B1EnL3pGI-virtualbox-win10-08-06-2023-11-33-49.png)
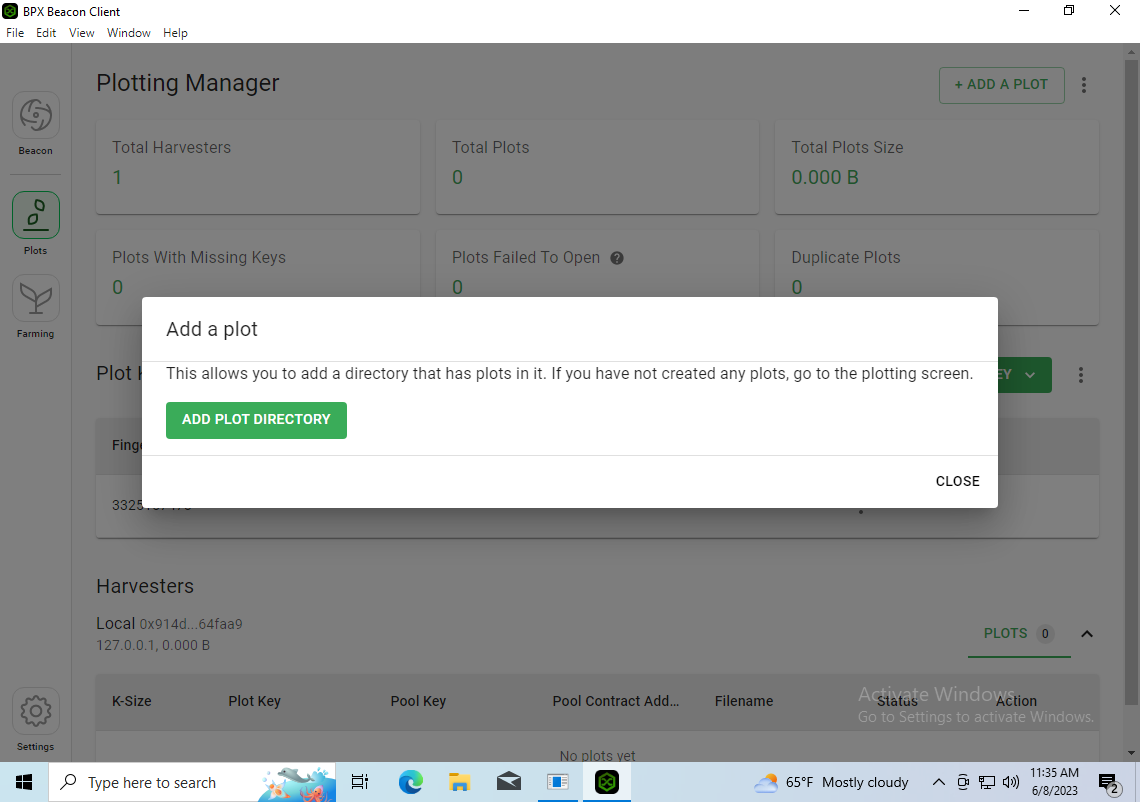
9\. Use the "**Add Plot Directory**" button to add each folder containing your plots. Once all directories are added, click "**Close**".
[](https://docs.bpxchain.cc/uploads/images/gallery/2023-06/VXbc2csvgPPADoo0-virtualbox-win10-08-06-2023-11-35-10.png)
10\. Farming will begin immediately after adding the first plots directory. You can check whether your plots pass through the filter in the **Farming** tab.
# Farming BPX on Debian / Ubuntu
1\. To start farming BPX, you need a fully synchronized full node. If you don’t have one, [follow all the steps of this tutorial](https://docs.bpxchain.cc/books/tutorials/page/installing-and-running-bpx-full-node-on-debian-ubuntu).
2\. Log in as the BPX Chain services user, or switch to this account from the root console with the following command:
```bash
su - bpxchain
```
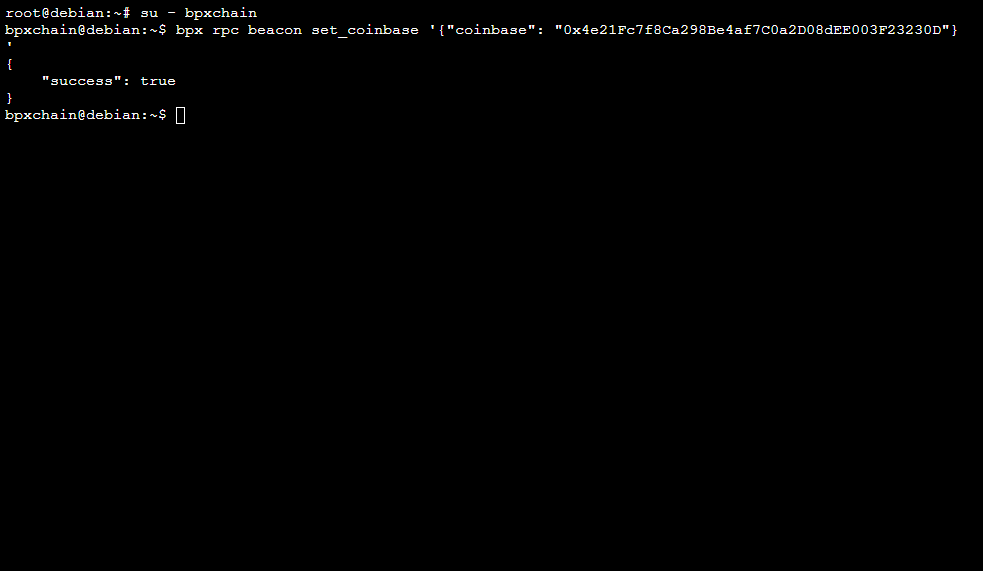
3\. Set the wallet address where you want to receive block rewards. Replace `0xAAAA...` with for instance, your MetaMask address.
```bash
bpx rpc beacon set_coinbase '{"coinbase": "0xAAAAAAAAAAAAAAAAAAAAAAAAAAAAAAAAAAAAAAA"}'
```
[](https://docs.bpxchain.cc/uploads/images/gallery/2024-11/ly1bfxZ5GG7sTUoa-farming-debian1.png)
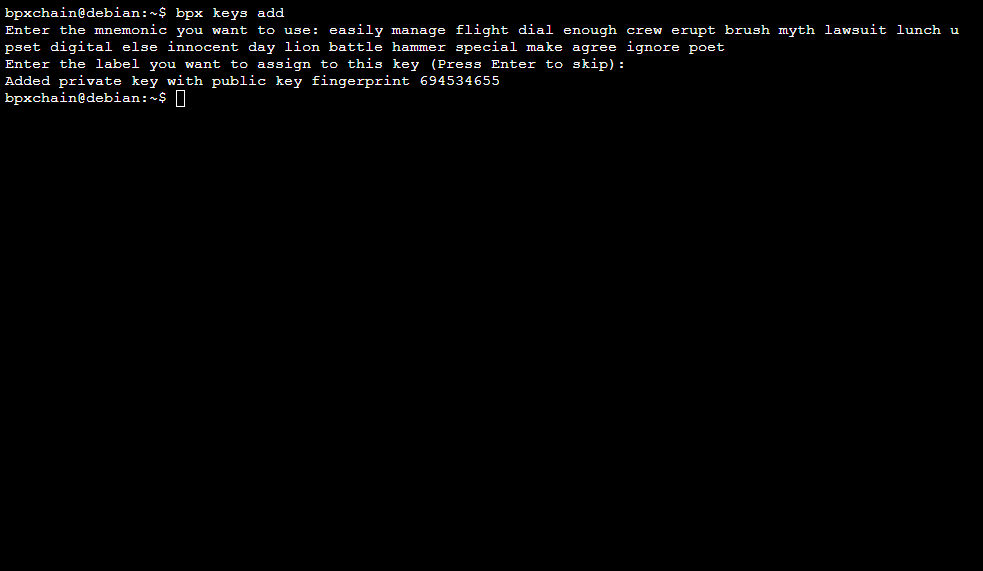
4\. Import the key that was used to create your plots. Run the following command and enter the 12 or 24 secret words. You can add an optional label for this key, or simply press **Enter** to skip.
```bash
bpx keys add
```
[](https://docs.bpxchain.cc/uploads/images/gallery/2024-11/dGjpXzi1FJjNAKU9-farming-debian2.png)
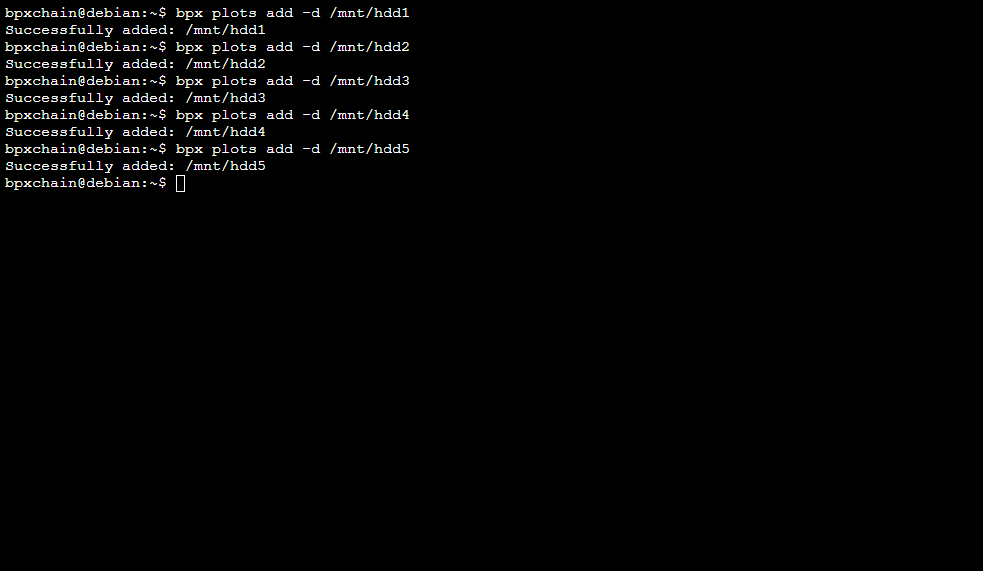
5\. Use the following command to add all folders with your plots. Replace `/mnt/hdd1` with the actual path.
```bash
bpx plots add -d /mnt/hdd1
```
[](https://docs.bpxchain.cc/uploads/images/gallery/2024-11/MOO8pkwMFWxTp2il-farming-debian3.png)
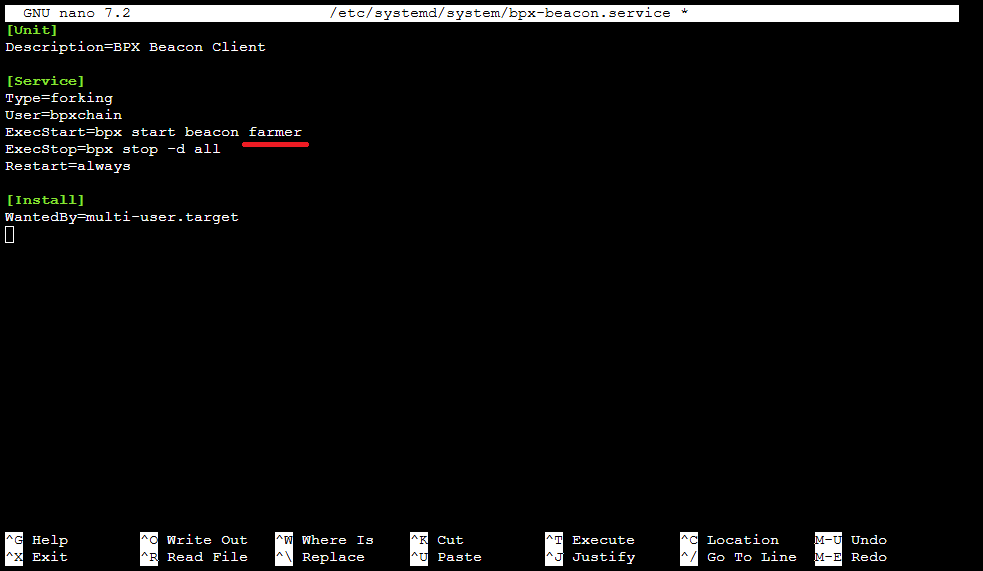
6\. Return to the **root** console. Modify the Beacon Client service configuration using any text editor, for example **nano**:
```bash
nano /etc/systemd/system/bpx-beacon.service
```
Replace the line:
```
ExecStart=bpx start beacon
```
With:
```
ExecStart=bpx start beacon farmer
```
Save the file by pressing **Control + O** and close the editor with **Control + X**.
[](https://docs.bpxchain.cc/uploads/images/gallery/2024-11/RSppLsqELghxAnoF-farming-debian4.png)
7\. Reload the system services configuration.
```bash
systemctl daemon-reload
```
8\. Restart the Beacon Client with the farmer process enabled.
```
systemctl restart bpx-beacon
```
9\. Your farmer is active and set to automatically start on system boot. Use the commands below to check the farming status.
```bash
su - bpxchain
bpx farm summary
```
# Development
# Deploying a smart contract on BPX mainnet using Remix IDE
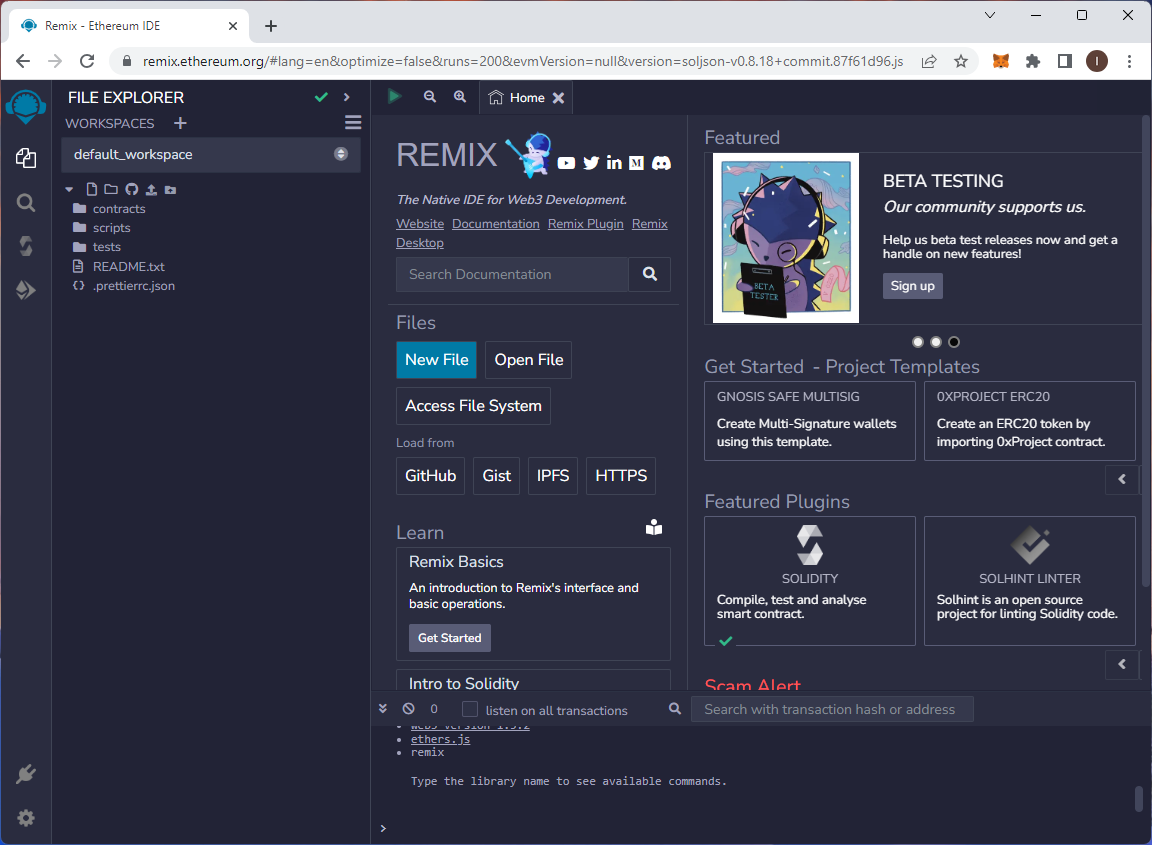
1. Open [Remix IDE](https://remix.ethereum.org).
[](https://docs.bpxchain.cc/uploads/images/gallery/2023-06/izSr2bshAKWbnmqr-remix1.png)
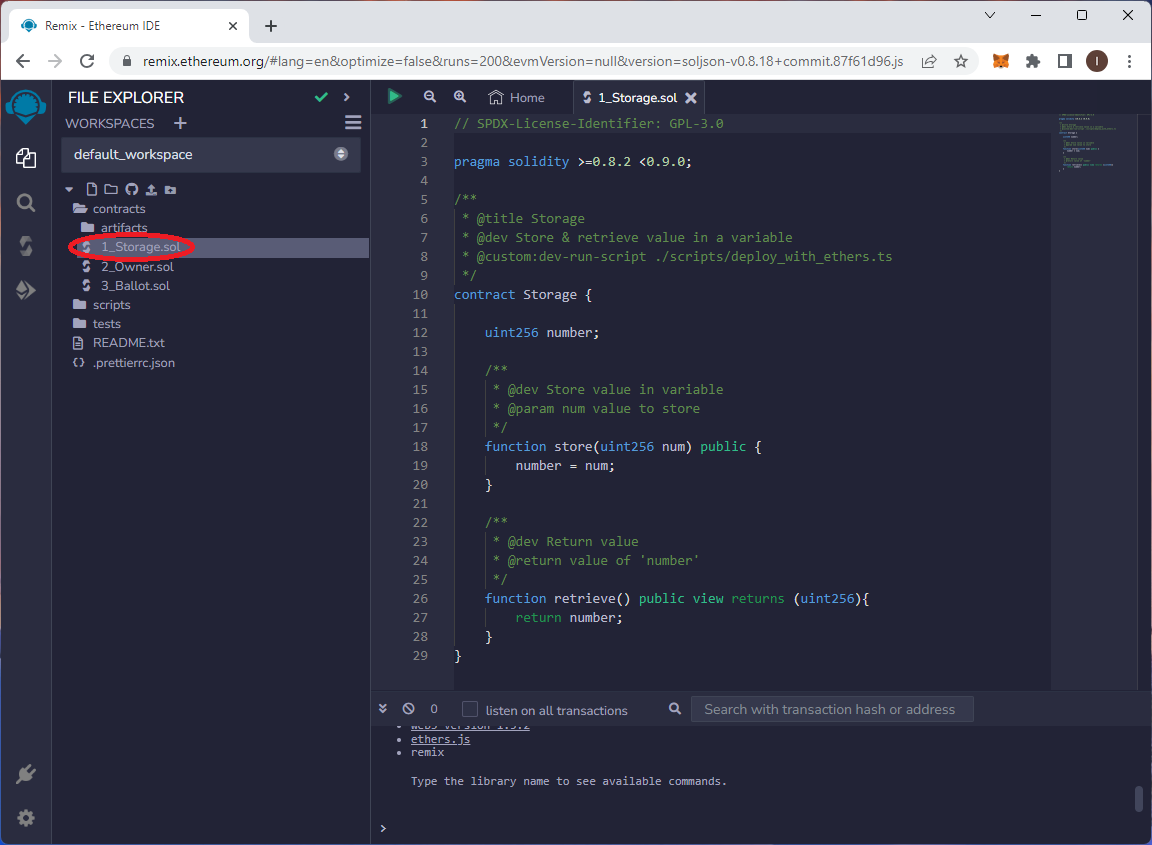
2\. In our example, we will use one of the sample contracts from the IDE. This contract provides two functions: the first, `store`, allows you to save any number in the contract, while the second, `retrieve`, enables you to read the stored number. Open the `contracts/1_Storage.sol` file.
[](https://docs.bpxchain.cc/uploads/images/gallery/2023-06/emlUI9RL3Z2VMrRL-remix2.png)
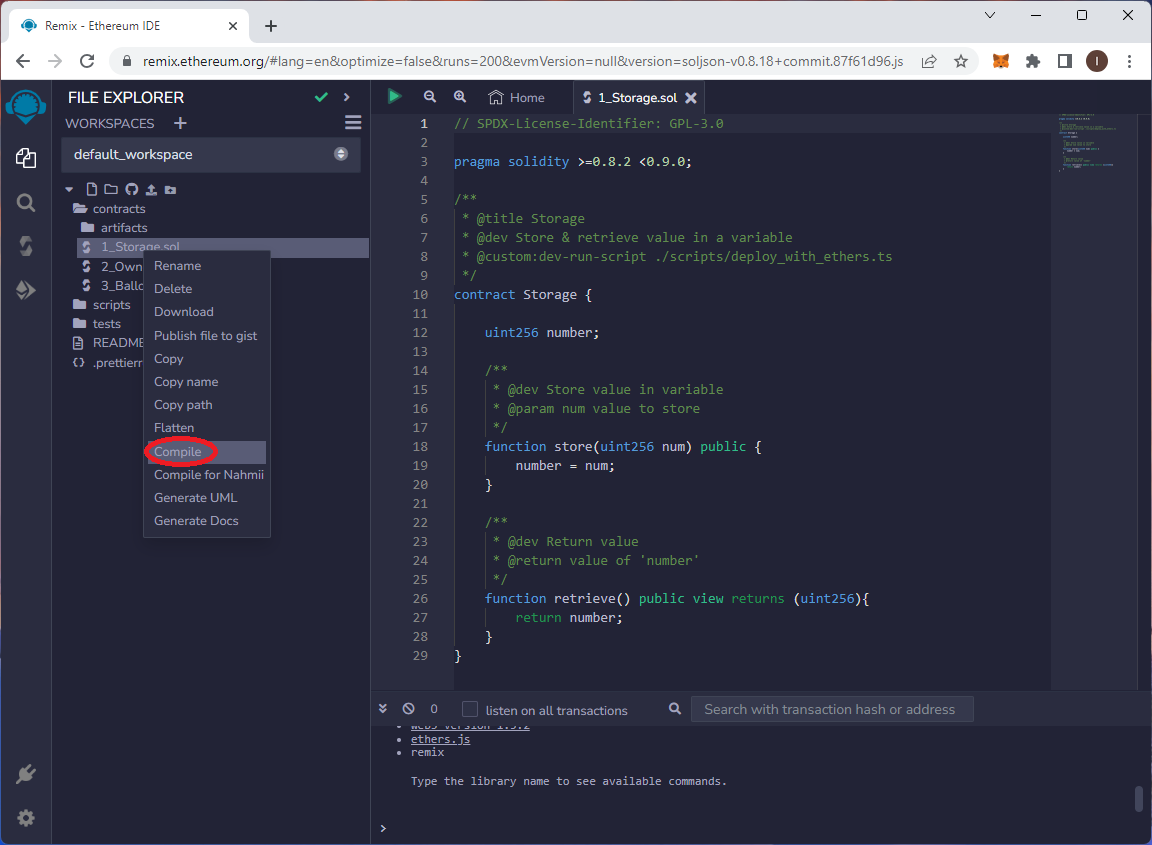
3\. Compile the contract by right-clicking on the file name and selecting **Compile**.
[](https://docs.bpxchain.cc/uploads/images/gallery/2023-06/8aDKXISPP0mbZsBD-remix3.png)
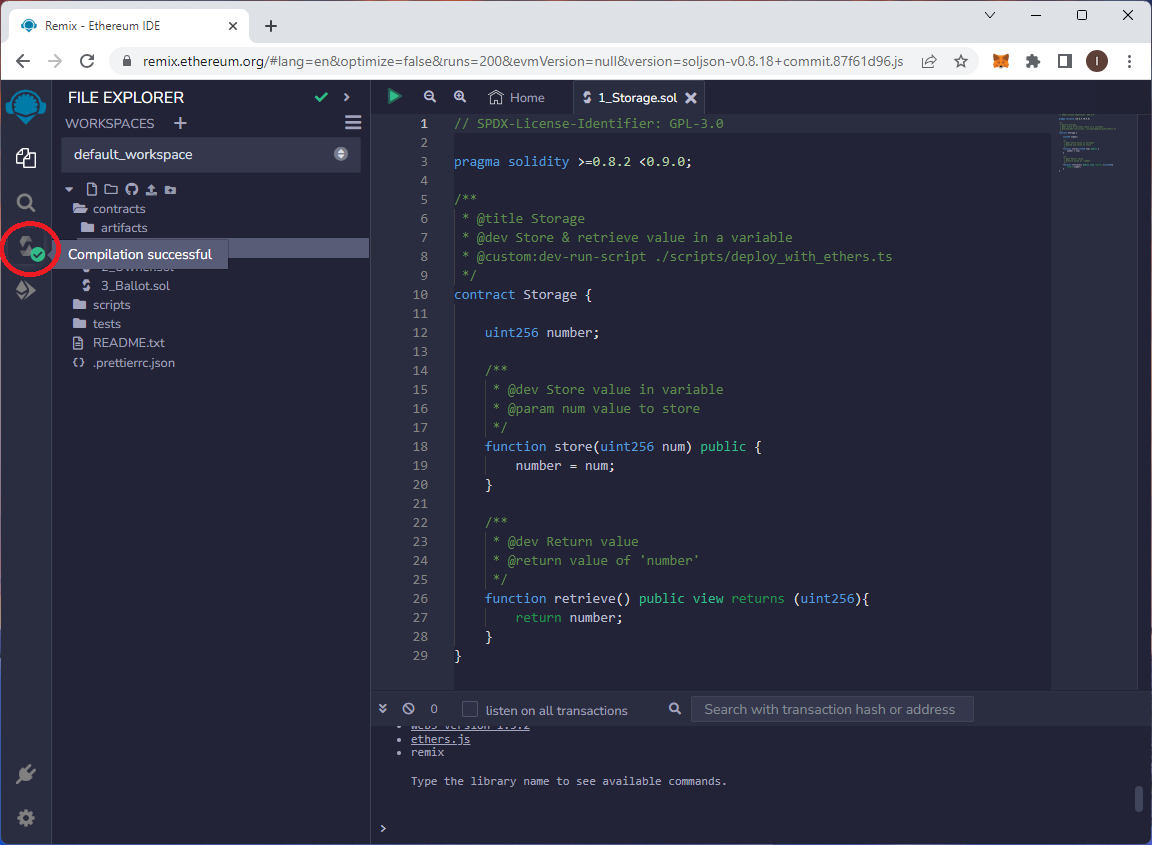
4\. When the source code is error-free and the compilation is successful, you will see a green success icon.
[](https://docs.bpxchain.cc/uploads/images/gallery/2023-06/7Ti4VpcSIvpRlU6M-remix4.png)
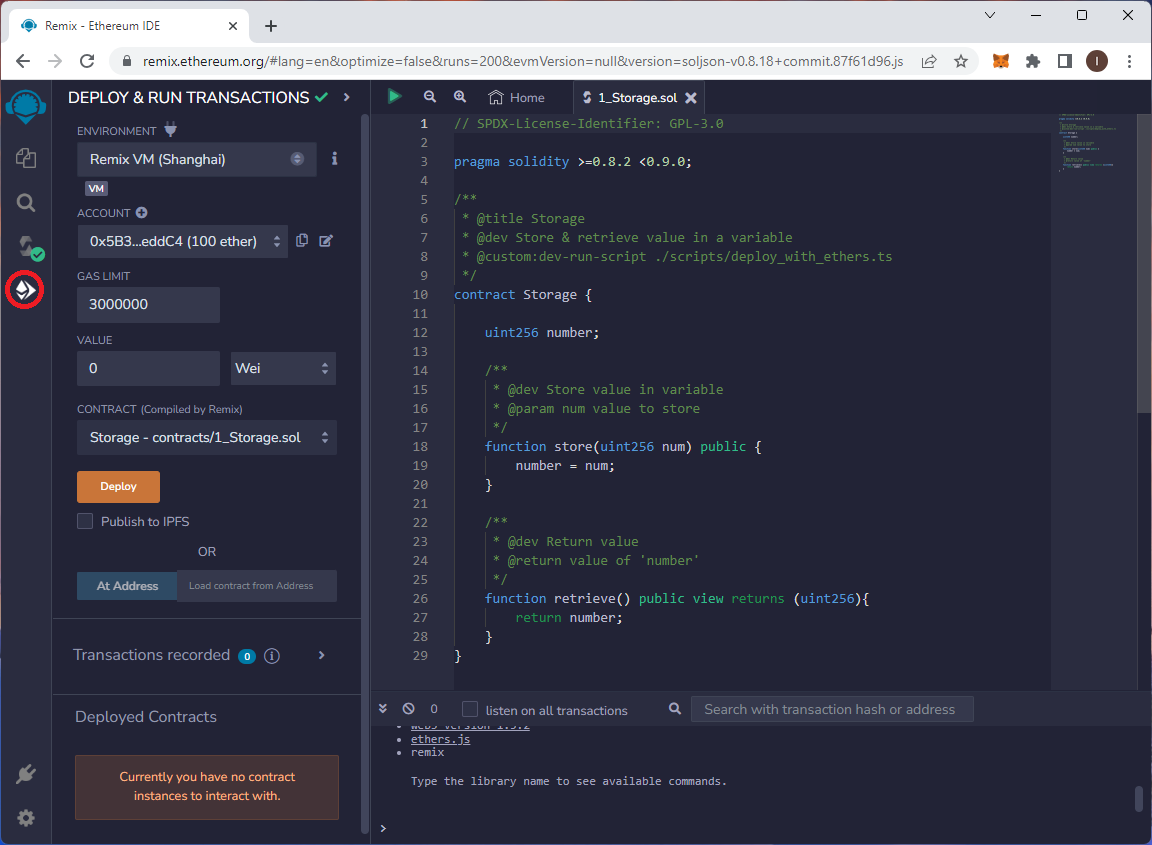
5\. Go to the **Deploy** tab.
[](https://docs.bpxchain.cc/uploads/images/gallery/2023-06/5nrXlGqJA4xJFtc6-remix5.png)
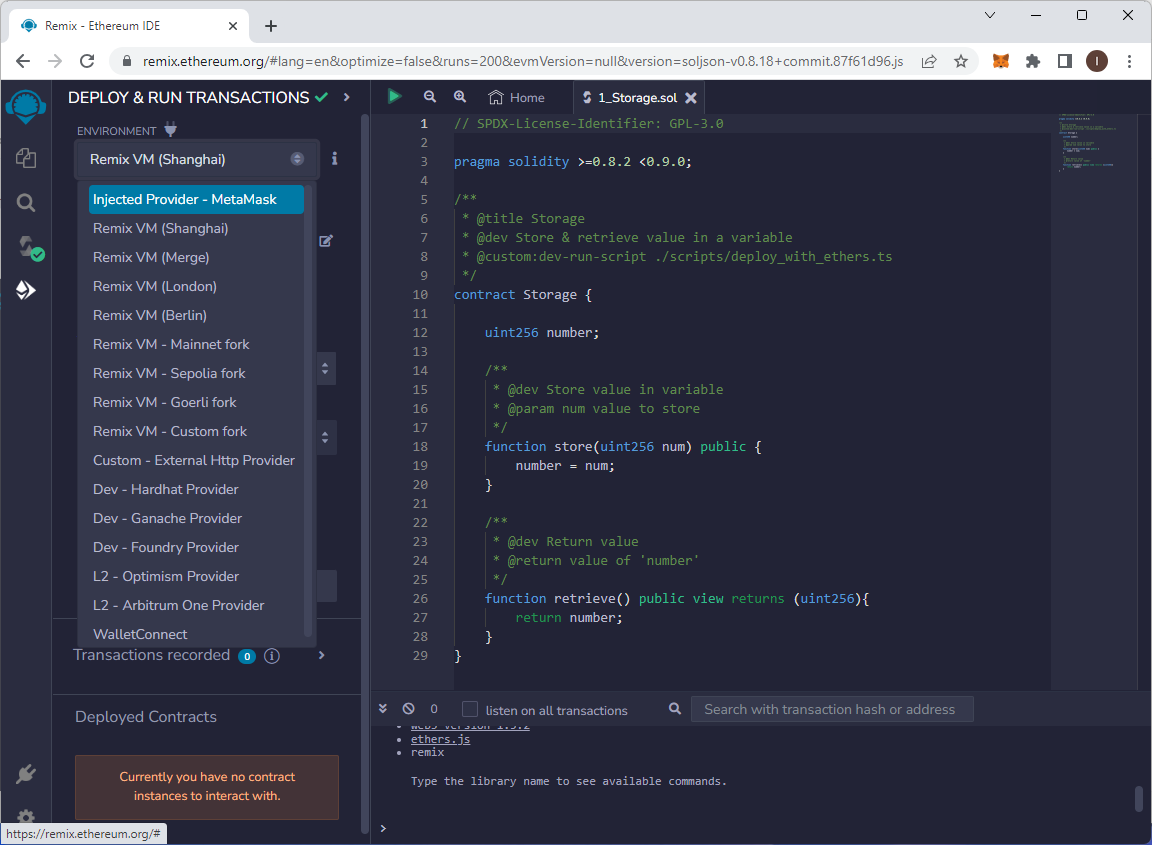
6\. Expand the **Environment** list and select **Injected Provider - MetaMask**.
[](https://docs.bpxchain.cc/uploads/images/gallery/2023-06/CahdOX6kYhQ1iqje-remix6.png)
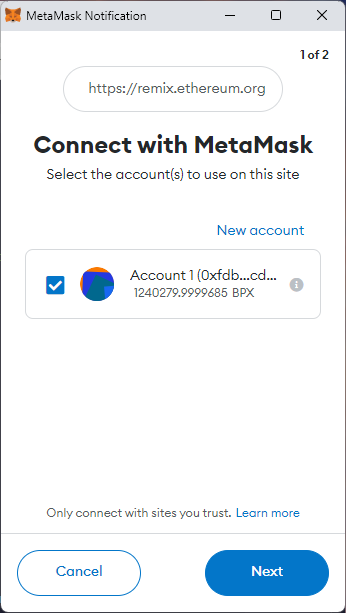
7\. Now MetaMask will prompt you for permission to connect to Remix IDE. Agree to the connection.
[](https://docs.bpxchain.cc/uploads/images/gallery/2023-06/uhqiKHEpqPF1W9ti-remix7.png)[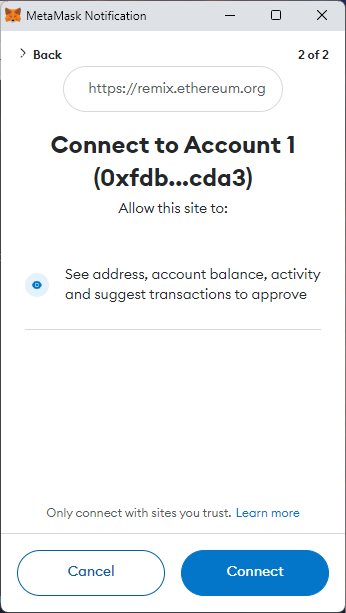](https://docs.bpxchain.cc/uploads/images/gallery/2023-06/ZO7wvczug8zXOHvl-remix8.png)
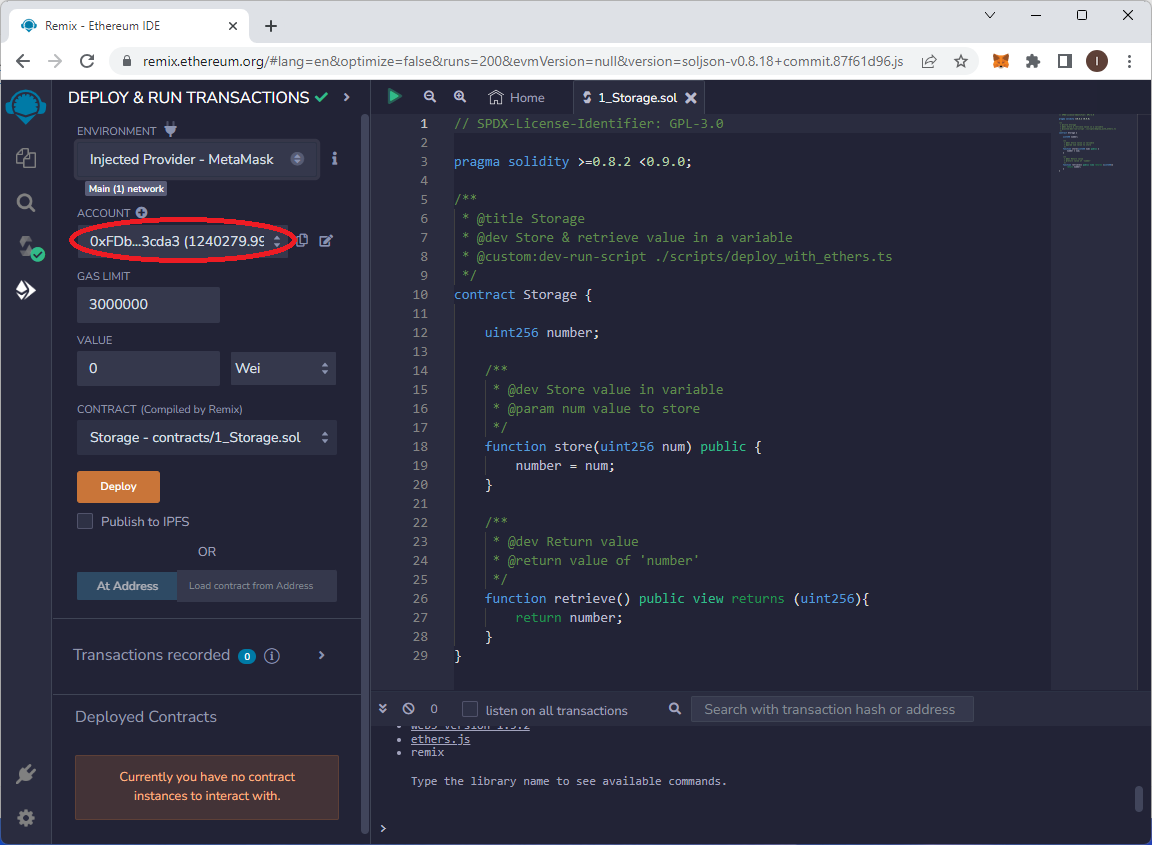
8\. After successfully connecting, you should see your account address and its balance in the highlighted field.
[](https://docs.bpxchain.cc/uploads/images/gallery/2023-06/i9mkkq84ELBg9sY6-remix9.png)
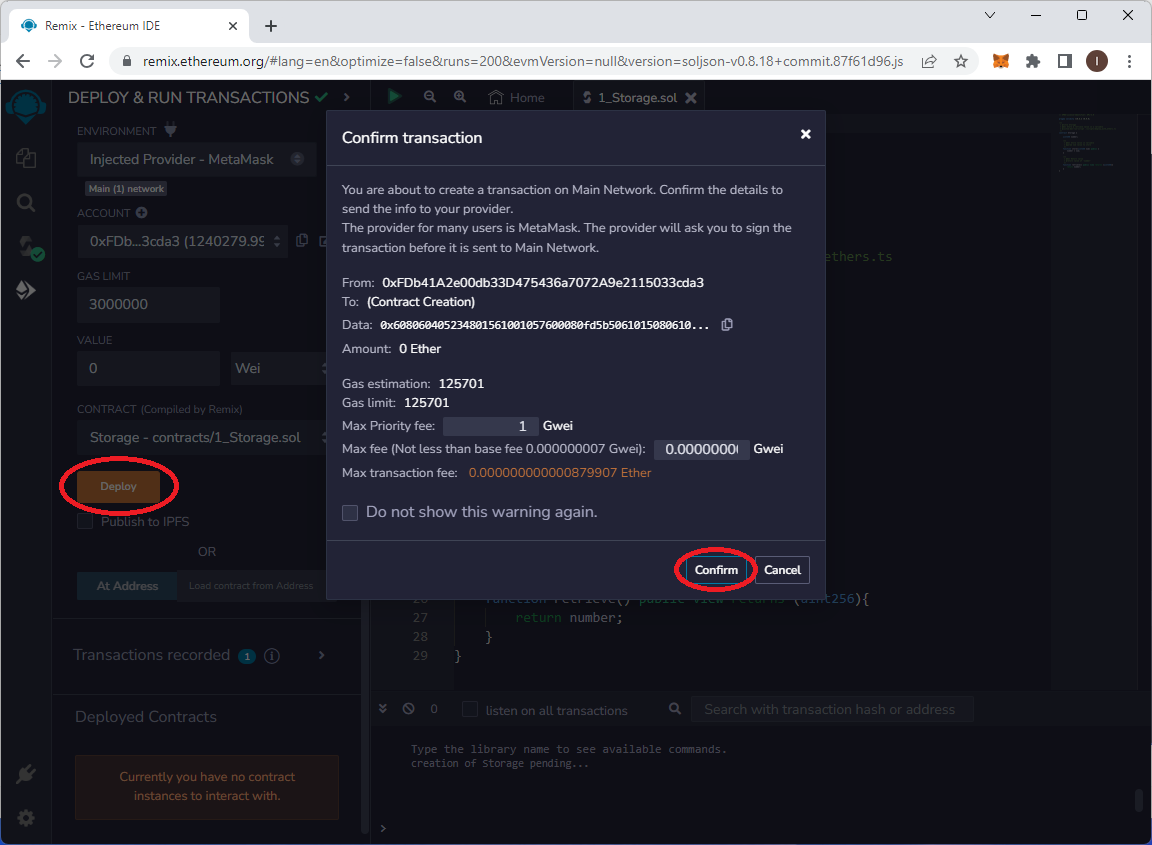
9\. Click "**Deploy**" to begin deploying your contract. Confirm the suggested gas settings.
[](https://docs.bpxchain.cc/uploads/images/gallery/2023-06/qDT5l3y7T7e7b8r0-remix10.png)
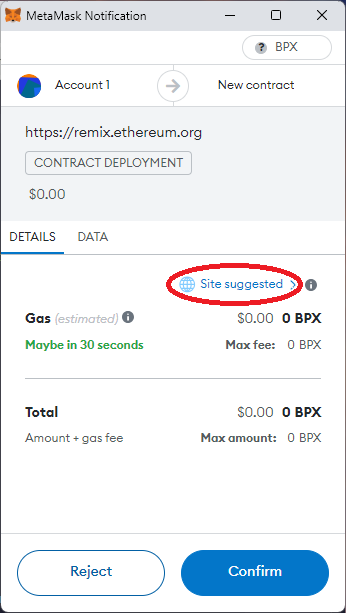
10.In the MetaMask popup window, change the gas settings by clicking on "**Site suggested**," then select the "**Market**" option. After that, confirm the transaction.
[](https://docs.bpxchain.cc/uploads/images/gallery/2024-11/X6od3Ux8ruO0NN3L-remix11.png) [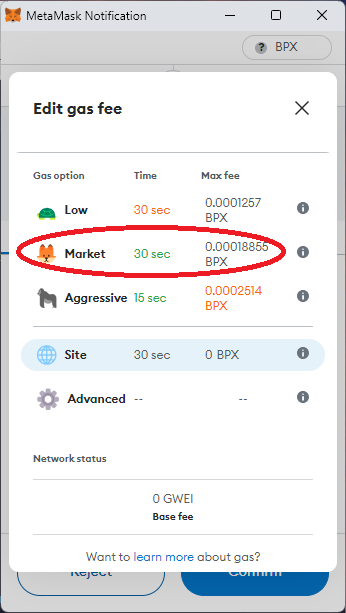](https://docs.bpxchain.cc/uploads/images/gallery/2024-11/zLbksXNx8hBCMeUZ-remix12.png) [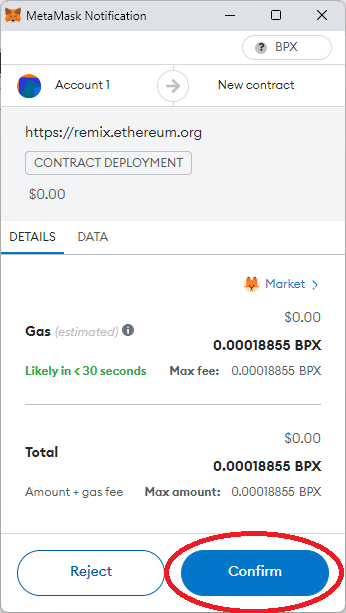](https://docs.bpxchain.cc/uploads/images/gallery/2024-11/uBwFAMI4BuMaVWVx-remix13.png)
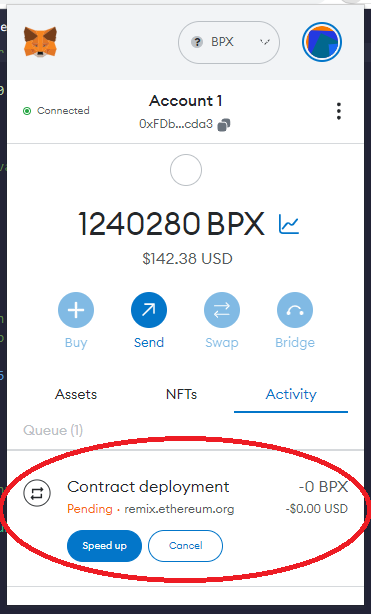
11\. Your contract is now deploying. If you open the MetaMask window, you should see a new pending transaction.
[](https://docs.bpxchain.cc/uploads/images/gallery/2024-11/hZFkqzqDbP6qVFjm-remix14.png)
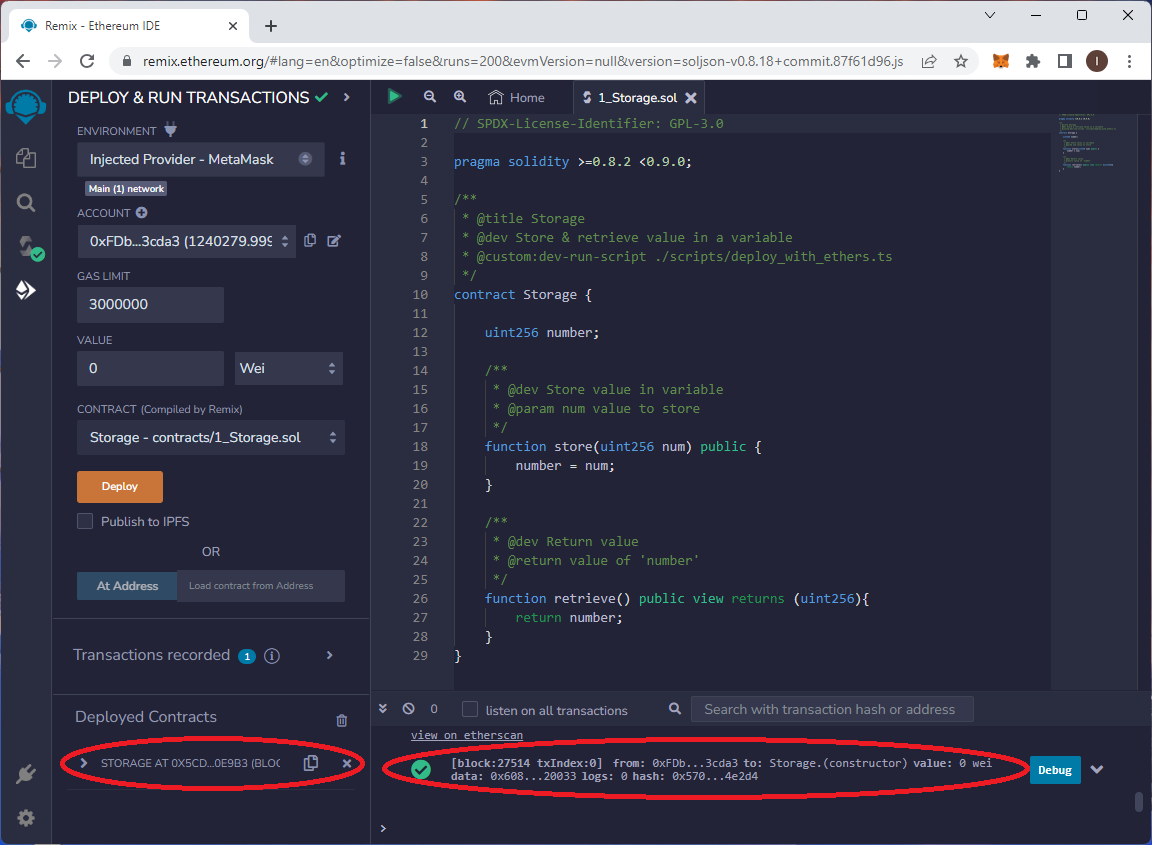
12\. Once the transaction is confirmed by the blockchain, you will see its confirmation and a new entry in the Deployed Contracts section. Your contract has been successfully deployed.
[](https://docs.bpxchain.cc/uploads/images/gallery/2023-06/5pHV9aYO4r4SEkYY-remix15.png)
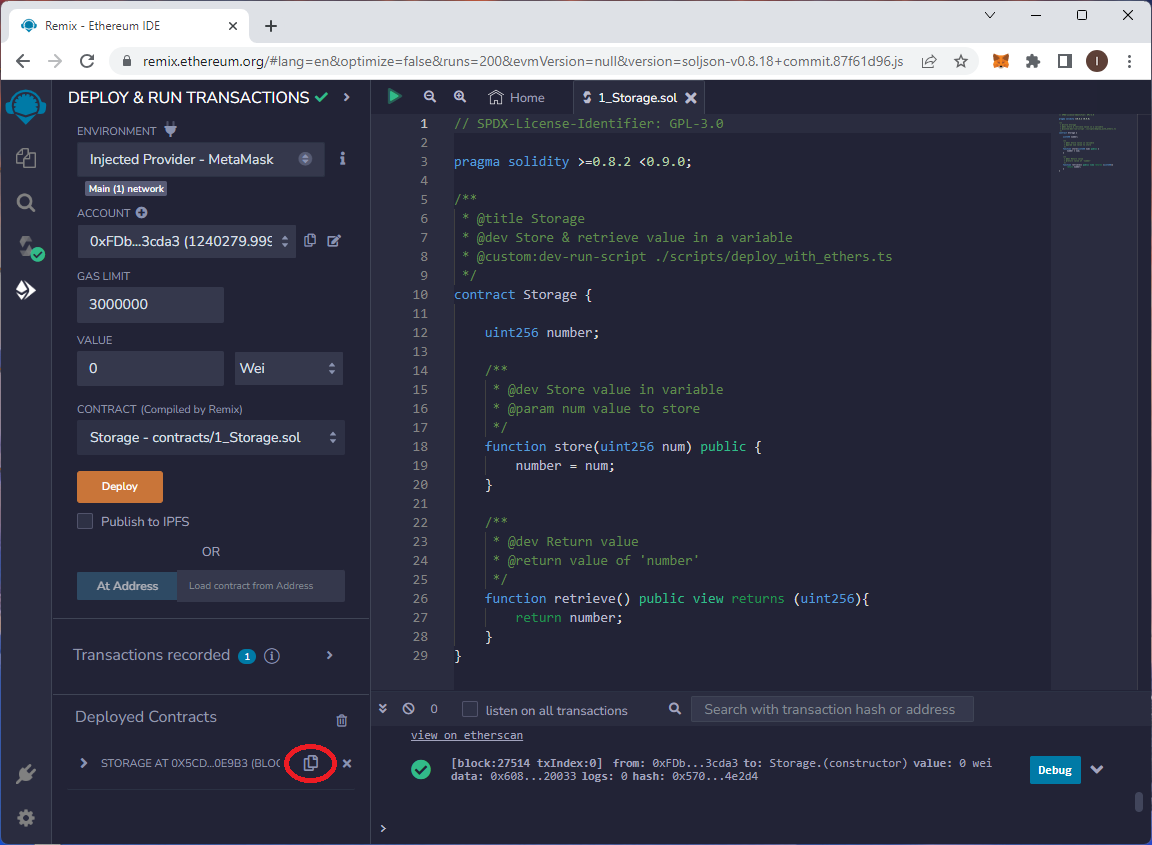
13\. You can use the highlighted button to copy the address of your new contract.
[](https://docs.bpxchain.cc/uploads/images/gallery/2023-06/QgbC5WF9bRu1H8U4-remix16.png)
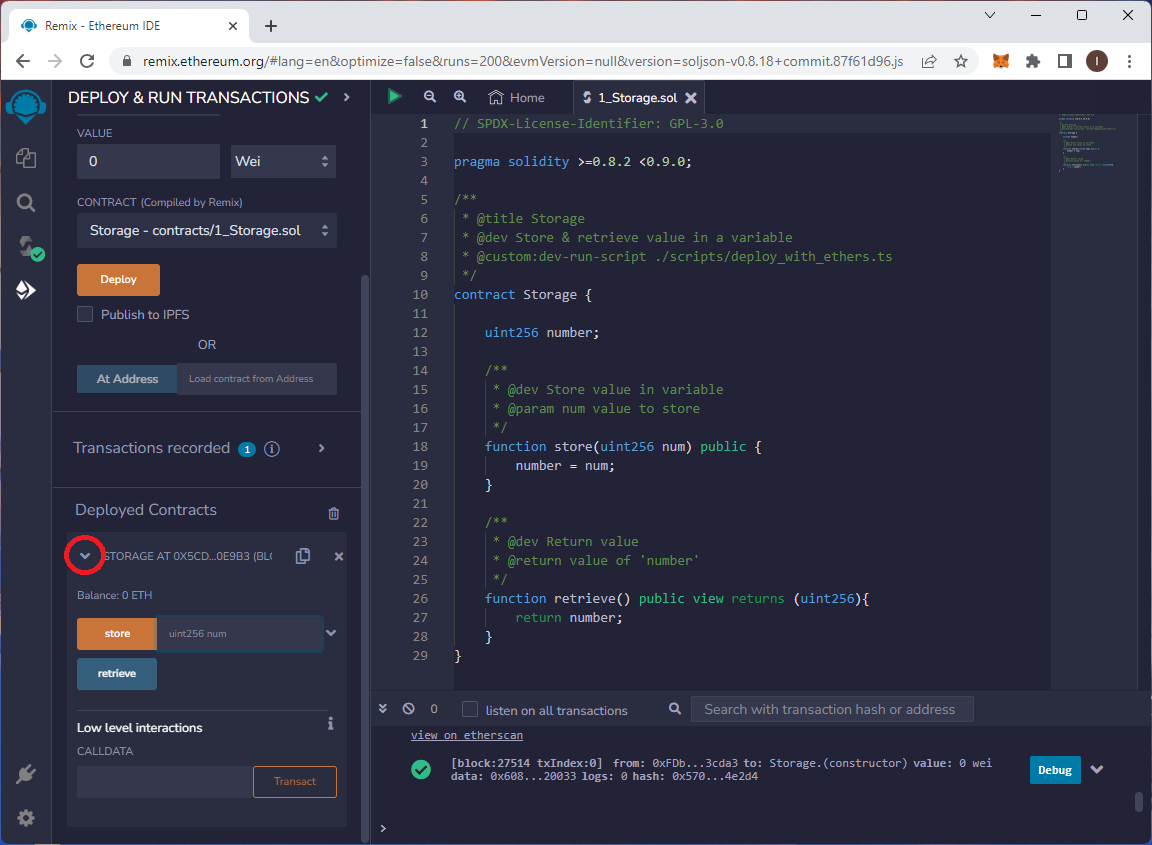
14\. You can interact with your contract directly from the IDE. Expand the list of contract methods to access them.
[](https://docs.bpxchain.cc/uploads/images/gallery/2023-06/WNPKcrYHKHK08pNs-remix17.png)
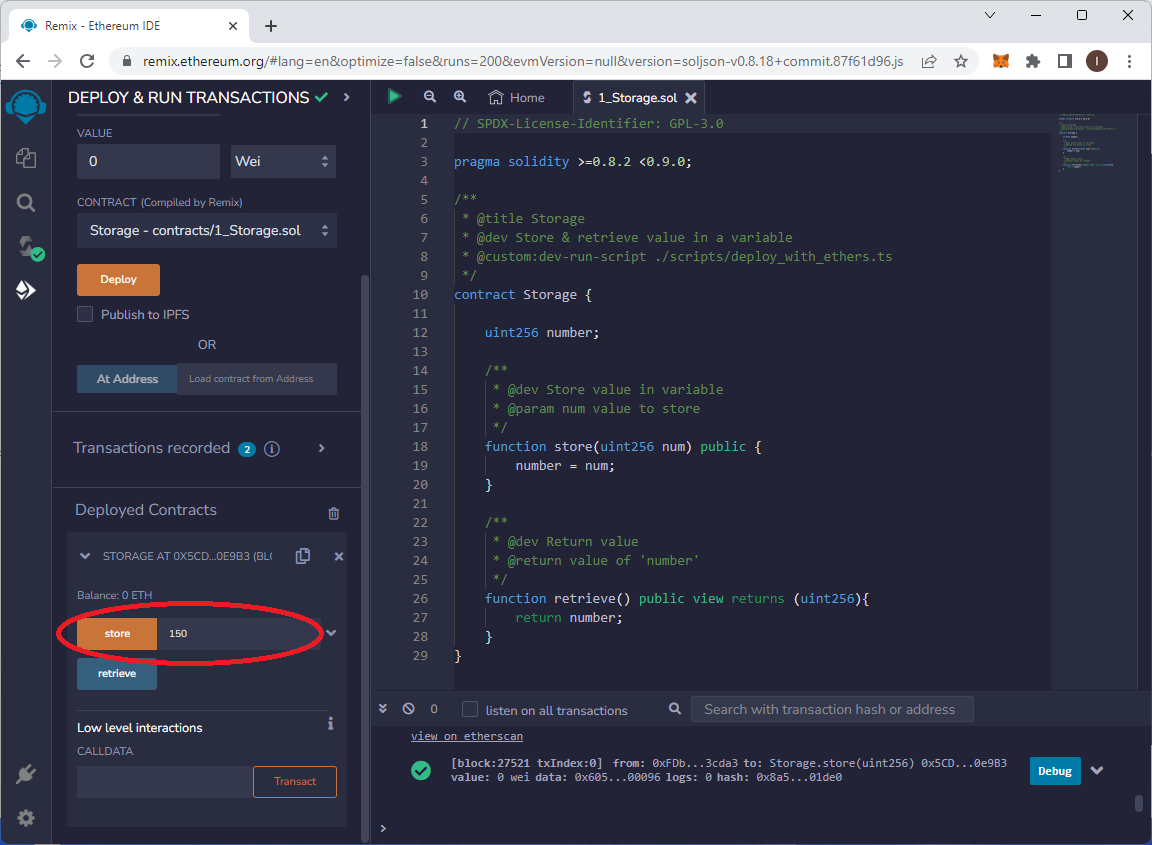
15\. Let's call the first function (`store`) to save a number in our sample contract. Enter a random number in the text field next to the "**store**" button, and then press the "**store**" button.
[](https://docs.bpxchain.cc/uploads/images/gallery/2023-06/qib8GMYrxJykPx9O-remix18.png)
16\. Confirm the transaction in your wallet as you did when deploying the contract. Saving data to a smart contract requires a transaction on the blockchain.
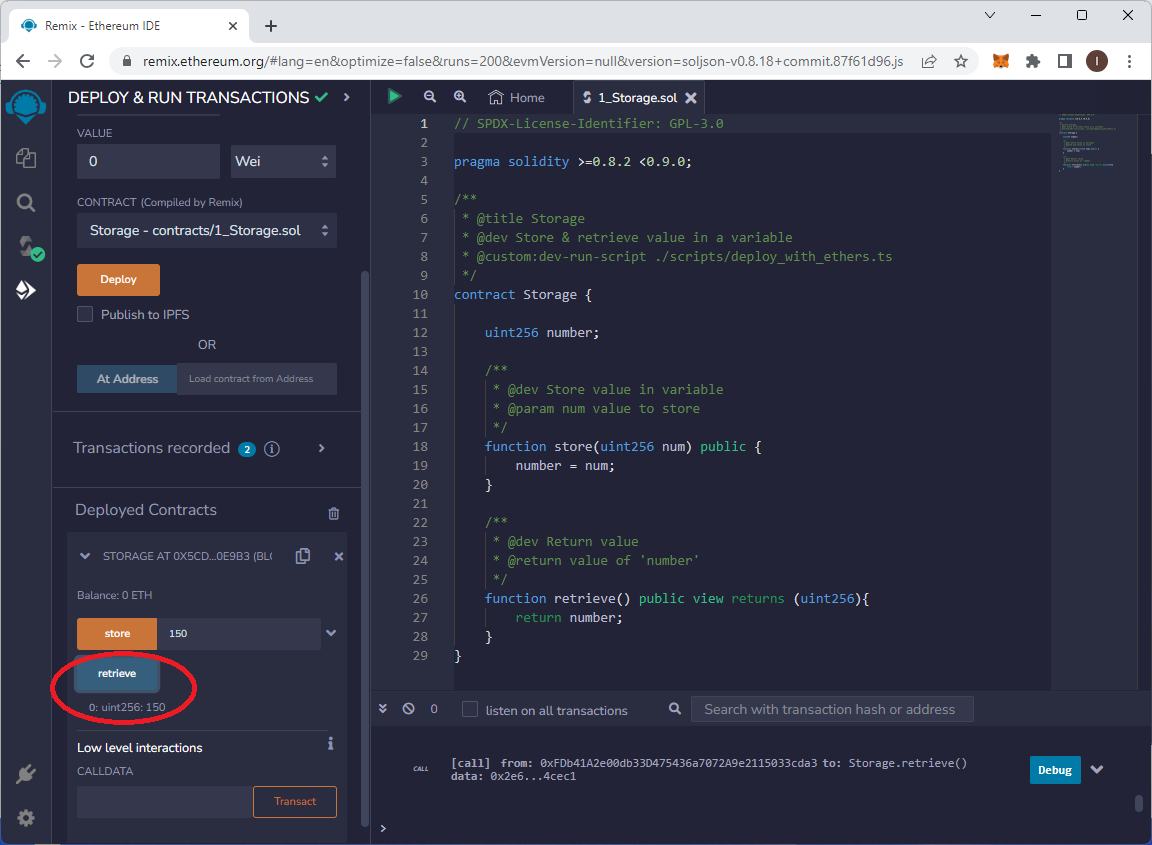
17\. When the transaction is confirmed, call the second method (`retrieve`) to read the number stored in the smart contract. Click the "**retrieve**" button, and the blockchain will return the value stored in the contract.
[](https://docs.bpxchain.cc/uploads/images/gallery/2023-06/gyTicg4MDqeOJPDd-remix19.png)
# Advanced usage
# Installing a timelord on Debian / Ubuntu
1\. To run a timelord, you need a fully synchronized full node. If you don’t have one, [follow all the steps of this tutorial](https://docs.bpxchain.cc/books/tutorials/page/installing-and-running-bpx-full-node-on-debian-ubuntu).
2\. The timelord software is not included in the official binary **.deb** or **.rpm** releases. You need to build it from the source code. Log in as root and install the **Git** client first.
```bash
apt-get install git
```
3\. The timelord installer script requires root access to install certain dependencies from APT repositories. Add the BPX Chain services user to the **sudoers** with the following command:
```bash
usermod -a -G sudo bpxchain
```
4\. Switch to the BPX Chain services user account:
```bash
su - bpxchain
```
4\. Clone the BPX Beacon Client git repository:
```
git clone https://github.com/bpx-network/bpx-beacon-client
```
5\. Install the Beacon Client from the source. This process may take several minutes.
```
cd bpx-beacon-client
. install.sh
```
6\. Install the timelord module:
```
. install-timelord.sh
```
7\. Press **Control + D** to log out and return to the root console.
8\. Create a configuration file for the timelord **systemd** service:
```bash
nano /etc/systemd/system/bpx-timelord.service
```
Insert the following file content:
```
[Unit]
Description=BPX Timelord
[Service]
Type=forking
User=bpxchain
WorkingDirectory=/home/bpxchain/bpx-beacon-client
ExecStart=bash -c ". activate && bpx start timelord-launcher-only timelord-only"
ExecStop=bash -c ". activate && bpx stop timelord-only timelord-launcher-only"
Restart=always
[Install]
WantedBy=multi-user.target
```
9\. Reload the system services configuration.
```bash
systemctl daemon-reload
```
10\. Enable automatic startup of the new service.
```
systemctl enable bpx-timelord
```
## Regular Timelord
If you want to run a regular timelord used by BPX consensus algorithm for generating new blocks, simply start the timelord with the default configuration:
```
systemctl start bpx-timelord
```
## Bluebox Timelord
To run the bluebox timelord, which compresses old blocks in the chain, you need to edit the configuration file:
```bash
nano /home/bpxchain/.bpxchain/beacon/config/config.yaml
```
- In the timelord section, set `bluebox_mode` to `True`
- In the beacon section, set `send_uncompact_interval` to recommended value of `300`
Save the file and exit. Then start the timelord service:
```
systemctl start bpx-timelord
```
# Setting up a private RPC server on Debian / Ubuntu
1. Set up and sync your BPX Chain full node [following this guide](https://docs.bpxchain.cc/books/tutorials/page/installing-and-running-bpx-full-node-on-debian-ubuntu). When creating the execution client systemd service, add some new parameters to the **bpx-geth** command line:
```
ExecStart=bpx-geth --syncmode snap --http --http.api web3,eth,net --http.corsdomain "*"
```
- `--http.api web3,eth,net` makes only safe APIs available to the public: `web3`, `eth` and `net`, while blocking access to potentially dangerous RPC methods, such as `admin` or `personal`
- `--http.corsdomain "*"` allows your RPC endpoint to be used in dApps across all domains
If you want your RPC endpoint to provide archive data as well, replace the mentioned line with the following one:
```
ExecStart=bpx-geth --syncmode full --gcmode archive --http --http.api web3,eth,net --http.corsdomain "*"
```
2\. Create an **A** record in your domain's DNS zone and point it to the IP address of your BPX full node.
**BPX developers recommendation:** All private RPC endpoints should be named `bpx-dataseed`, so if your domain is `yourdomain.com`, please name your RPC server `bpx-dataseed.yourdomain.com`.
3\. Install the **nginx** HTTP server and **certbot**:
```
apt-get install nginx python3-certbot-nginx
```
4\. Configure nginx as a reverse proxy for **bpx-geth**:
```
nano /etc/nginx/sites-available/bpx-dataseed.yourdomain.com
```
```
upstream geth {
least_conn;
server 127.0.0.1:8545;
}
server {
server_name bpx-dataseed.yourdomain.com;
location / {
proxy_pass http://geth;
}
}
```
Save file and exit.
5\. Enable the new site and restart nginx:
```
ln -s /etc/nginx/sites-available/bpx-dataseed.yourdomain.com /etc/nginx/sites-enabled/bpx-dataseed.yourdomain.com
systemctl restart nginx
```
6\. Obtain a free SSL certificate from **Letsencrypt** to enable HTTPS:
```
certbot --nginx -d bpx-dataseed.yourdomain.com
```
During the Certbot wizard, provide your email address for notifications related to the certificate, then select the option to redirect all HTTP traffic to HTTPS.
7\. It's done. Test your RPC endpoint by adding `https://bpx-dataseed.yourdomain.com` instead of the public RPC address in your wallet, such as MetaMask.
Let the BPX developers know that you are hosting your own RPC endpoint. If it operates reliably for a certain period, we will promote it on our website and in other places.